Learning how to use a stud finder properly can save you from making expensive mistakes when hanging shelves, TVs, mirrors, cabinets, or other heavy items on a wall. A stud finder is a simple handheld tool designed to locate the wooden or metal framing hidden behind drywall. These wall studs provide the strength needed to support mounted objects safely.
Many homeowners try to drill directly into drywall without checking for studs first. This often leads to weak installations, damaged walls, or even dangerous contact with hidden electrical wires. Using a stud finder correctly helps you avoid these problems while making your DIY projects much easier and safer.
Today, most people use either electronic or magnetic stud finders. Electronic models scan for changes in wall density, while magnetic models locate screws or nails attached to studs. Both types can work well when used properly, but beginners often struggle because they move the tool too quickly, calibrate it incorrectly, or misunderstand the readings.
This guide explains how to use a stud finder step by step in simple language. You will also learn how to avoid false readings, scan drywall and ceilings accurately, work safely around electrical wiring, and improve your overall scanning accuracy.
How to Use a Stud Finder
| Step | What to Do | Why It Matters |
| 1 | Check the batteries | Weak batteries cause inaccurate readings |
| 2 | Place the tool flat on the wall | Proper contact improves accuracy |
| 3 | Calibrate in a hollow area | Prevents false stud detection |
| 4 | Slide slowly across the wall | Helps sensors detect density changes |
| 5 | Mark both stud edges | Makes it easier to find the center |
| 6 | Scan again from the opposite side | Confirms the stud location |
| 7 | Watch for wire alerts | Helps avoid drilling into live wires |
| 8 | Verify with a knock test | Adds extra confirmation before drilling |
Understanding How a Stud Finder Works
Before you begin scanning a wall, it helps to understand how a stud finder actually works. Electronic stud finders use internal sensors to detect changes in density behind drywall. When the device moves from a hollow area to a solid wooden stud, the sensor notices the difference and alerts you with lights, sounds, or screen indicators.
Basic electronic models usually detect only the edge of a stud, while advanced versions can locate the center automatically. Some newer tools also include deep scanning modes and live wire detection for extra safety.
Magnetic stud finders work differently. Instead of detecting density, they locate the metal screws or nails used to attach drywall to the framing. As you move the magnetic tool across the wall, it pulls toward the hidden fasteners. Since drywall screws are driven directly into studs, this helps you identify the stud location.
Each type has its advantages. Electronic stud finders are usually faster and easier for beginners, especially on standard drywall. Magnetic models are simple, affordable, and reliable because they do not require batteries. Choosing the right type often depends on the wall material and the kind of project you are working on.
Choosing the Best Stud Finder for Your Project
Finding the best stud finder does not always mean buying the most expensive model. The right tool depends on your wall type, experience level, and project needs. For basic home use, a simple electronic stud finder is usually enough for locating studs behind standard drywall.
Some features can make the scanning process easier and more accurate. Deep scan mode helps when walls are thicker than normal or covered with plaster. Wire detection alerts warn you if electrical cables are present behind the wall. Center-finding functions simplify the process by identifying the middle of the stud automatically.
If you only plan to hang lightweight shelves or pictures occasionally, a basic magnetic stud finder may work perfectly fine. However, for mounting heavy TVs, cabinets, or ceiling fixtures, an advanced electronic model provides more confidence and accuracy.
When buying your first stud finder, look for a device with clear indicators, comfortable handling, and easy calibration. Complicated controls can confuse beginners and increase the chances of false readings.
Preparing the Wall Before Scanning
Good preparation plays a major role in accurate stud detection. Before using the stud finder, inspect the wall surface carefully. Drywall thickness, plaster texture, tile, and wallpaper can all affect scanning performance.
Remove decorations, frames, or nearby metal objects that could interfere with the sensor readings. Electronic interference from appliances or wiring close to the scanning area may also cause inconsistent results.
Keeping the stud finder flat against the wall is very important. Dust, bumps, or uneven surfaces can interrupt contact with the wall and reduce accuracy. Many DIY homeowners place painter’s tape across the scanning area so they can mark stud edges with a pencil without damaging the wall.
It is also smart to think about where studs are likely positioned. In most homes, studs are spaced either 16 or 24 inches apart. Knowing this standard spacing helps you verify your findings later.
How to Use a Stud Finder on Drywall Correctly
Understanding how to use a stud finder on drywall correctly is the most important part of the process. Start by placing the device flat against the wall in an area where you believe no stud is present. This step matters because electronic stud finders need calibration before scanning.
Press and hold the activation button while keeping the tool perfectly still. After a moment, the device will beep or light up to show calibration is complete. If it flashes repeatedly or gives an error, you may have started directly over a stud. Move a few inches away and try again.
Once calibrated, slowly slide the stud finder horizontally across the wall. Keep steady pressure and avoid tilting the device. Moving too quickly is one of the biggest reasons people receive inaccurate readings.
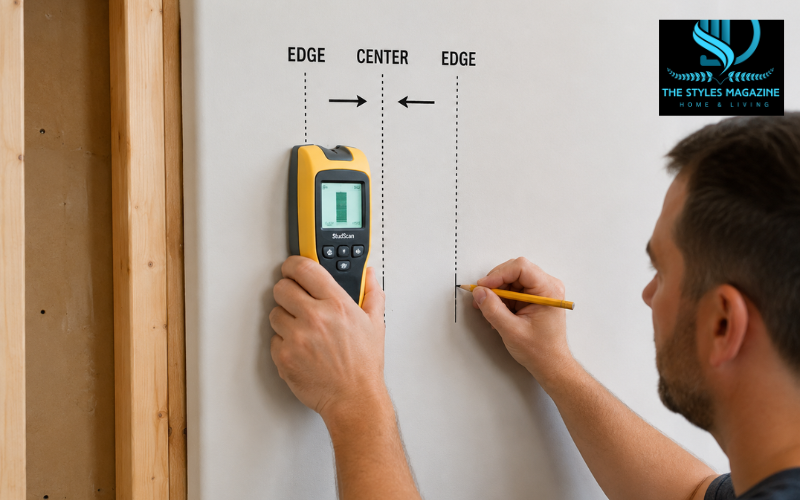
When the tool detects the edge of a stud, it will beep or flash. Mark that point lightly with a pencil. Continue moving past the stud, then scan back from the opposite direction to find the second edge. The center of the stud will sit directly between those two marks.
Many advanced models display the stud center automatically. Even with these tools, it is still a good idea to confirm the edges manually for better accuracy.
Finding Studs Around Electrical Wires Safely
Modern stud finders often include wire detection features designed to improve safety. This is especially useful when drilling into walls where hidden electrical cables may be present.
Wires commonly run vertically beside outlets, switches, and light fixtures. When scanning near these areas, pay close attention to warning lights or electrical indicators on the device. Some stud finders display a lightning bolt symbol or red flashing light when live wires are detected.
If your stud finder warns about electrical wiring, avoid drilling directly into that location until you confirm the wall is safe. Turning off power at the breaker box before drilling can provide additional protection.
It is important to remember that wire detection systems are not perfect. Older homes, metal conduit, and thick wall materials can sometimes confuse the sensors. Always use caution when working near electrical systems.
How to Use a Stud Finder on a Ceiling
Learning how to use a stud finder on a ceiling can feel more difficult because you are working overhead and scanning for joists instead of wall studs. Ceiling surfaces are also more likely to have uneven textures or thicker materials that affect sensor readings.
Start by calibrating the stud finder exactly as you would on a wall. Hold the tool flat against the ceiling in a hollow area and keep it still during calibration. Slow, controlled movement is even more important overhead because sudden shifts can interrupt the scan.
As you move the tool horizontally, listen carefully for the detection signal. Mark both edges of the ceiling joist and identify the center point before drilling. Ceiling joists are essential for safely hanging heavy light fixtures, storage racks, or ceiling-mounted equipment.
Textured ceilings may require multiple passes for accurate results. If your stud finder struggles to read the surface, switching to deep scan mode can sometimes improve detection.
Using a Zircon Stud Finder Step by Step
Many homeowners search for how to use a stud finder Zircon because these models are widely available and beginner-friendly. Zircon stud finders typically use electronic sensors with clear visual and sound indicators.
To begin, place the device flat against the wall away from suspected stud locations. Press and hold the power button while the tool calibrates. Most Zircon models signal successful calibration with a light or short beep.
Slide the stud finder slowly across the wall while watching the display carefully. The lights usually increase as you approach the stud center. Once the center indicator appears, mark the spot for drilling or mounting.
One common mistake users make with Zircon stud finders is lifting the tool slightly during scanning. Even a small loss of wall contact can affect the reading. Slow movement and steady pressure usually produce the best results.
How to Use the Stanley Stud Finder STHT77403
The Stanley Stud Finder STHT77403 is another popular model designed for home improvement projects. Understanding its controls and indicators can improve your scanning accuracy significantly.
This model includes buttons for powering the unit and selecting scanning modes. Standard scan mode works well for drywall, while deeper modes may help on thicker surfaces. Always calibrate the device before starting a scan.
Place the stud finder flat against the wall and move it slowly in a straight line. When the edge indicator lights up, mark the location. Continue scanning until you locate the opposite edge. The center point between the marks identifies the safest drilling position.
If the device produces inconsistent results, weak batteries or uneven wall contact may be the problem. Recalibrating and slowing down your scanning speed often solves these issues.
Common Reasons Stud Finders Give False Readings
False readings are one of the biggest frustrations for beginners learning how to use a stud finder. Fortunately, most errors happen because of a few common mistakes.
Calibrating directly over a stud is a major issue. Since the device assumes the starting point is hollow, beginning over solid wood confuses the sensor immediately. Moving too quickly across the wall also reduces accuracy because the tool cannot analyze density changes properly.
Certain wall materials create additional challenges. Plaster, tile, thick drywall, and textured finishes can interfere with sensor performance. Pipes, metal framing, and electrical wiring may also trigger incorrect readings.
Battery condition matters more than many people realize. Weak batteries can reduce sensor strength and cause inconsistent alerts. Replacing batteries regularly helps maintain reliable performance.
How to Confirm You’ve Actually Found a Stud
Even after the stud finder alerts you, it is smart to verify the location before drilling. One of the easiest methods is the knock test. Tap lightly along the wall using your knuckles. Hollow areas sound empty, while studs produce a more solid, dull sound.
You can also measure the spacing between studs. In most homes, framing follows standard intervals of 16 or 24 inches. If your next stud appears within that pattern, your reading is likely correct.
Scanning from both directions improves accuracy as well. Marking both stud edges and locating the center point gives you more confidence before drilling into the wall.
Taking a few extra minutes to verify your findings can prevent unnecessary wall damage and installation mistakes.
Can a Stud Finder App Replace a Real Stud Finder?
Some smartphone apps claim to work as stud finders by using magnetic sensors built into the phone. While these apps may occasionally detect screws or nails, they are generally far less accurate than dedicated stud finders.
Most stud finder apps cannot reliably detect wooden framing behind drywall. Their performance also varies depending on the phone model and sensor quality. For simple tasks, they may help identify approximate screw locations, but they should not replace a real tool for important mounting projects.
Dedicated stud finders remain more reliable because they are specifically designed for wall scanning. They offer better calibration, improved depth detection, and safer wire identification features.
Helpful Tips for Better Stud Finder Accuracy
Improving your scanning technique can make a huge difference in accuracy. Always move the stud finder slowly and maintain full contact with the wall surface. Fast or uneven movement increases the risk of false readings.
Deep scan mode should only be used when necessary because it may sometimes reduce precision on standard drywall. Good lighting also helps you keep your marks accurate and visible.
Repeated scans are often the best way to confirm results. Experienced DIY homeowners usually scan the same area multiple times from different directions before drilling.
Practicing on known stud locations can also help beginners become more comfortable with the tool’s behavior and signals.
Watching a Stud Finder Video Before Your First Project
For beginners, watching a stud finder video can make the learning process much easier. Seeing proper scanning technique in action helps you understand how quickly to move the tool and how to interpret different signals.
A reliable tutorial should demonstrate calibration clearly and explain how to identify both stud edges. Good videos also show real-world examples of false readings and troubleshooting methods.
Watching someone scan drywall, ceilings, or tricky wall surfaces can build confidence before you start your own project. Visual demonstrations are especially helpful for understanding hand placement and movement speed.
Conclusion
Learning how to use a stud finder correctly is an important skill for safe and successful home improvement projects. Whether you are mounting a TV, hanging shelves, or installing heavy decorations, accurate stud detection protects both your walls and your hardware.
The key to reliable results is patience, proper calibration, and slow scanning movement. Taking time to verify stud locations, watch for electrical wiring, and confirm the stud center before drilling can prevent costly mistakes.
Both electronic and magnetic stud finders can work well when used properly. With practice and careful technique, even beginners can locate studs confidently and complete DIY projects with much better accuracy and safety.
FAQs
Why Is My Stud Finder Giving False Readings?
False readings usually happen because of weak batteries, moving too quickly, uneven wall contact, or calibrating directly over a stud instead of a hollow area.
Can A Stud Finder Detect Electrical Wires?
Many modern electronic stud finders include wire detection features that warn you about live electrical wires hidden behind drywall before drilling.
Do Stud Finders Work On Plaster Walls?
Yes, but plaster walls are harder to scan accurately. Using deep scan mode and moving the tool slowly can improve detection results.
Is A Magnetic Stud Finder Better Than An Electronic One?
Magnetic stud finders are simple and reliable, while electronic models are usually faster and easier for beginners because they detect stud edges and centers automatically.
How Far Apart Are Wall Studs Normally?
Most wall studs are spaced either 16 inches or 24 inches apart from center to center in standard residential construction.
Enjoyed it? Find more exclusive content on The Styles Magazine.
Disclaimer: This article is for general informational and educational purposes only. Always follow manufacturer instructions, use proper safety equipment, and consult a professional if you are unsure about electrical wiring, structural walls, or drilling safety.