Wall damage is one of the most common problems homeowners face. Small nail holes from hanging pictures, dents caused by furniture, and larger cracks or openings from accidental impacts can all leave walls looking worn and unfinished. Even minor damage can stand out once painted walls begin to collect marks and imperfections over time.
Learning how to patch a hole in the wall is an important DIY skill because different types of damage require different repair methods. A tiny nail hole may only need a small amount of filler, while larger openings often require mesh support, a drywall patch kit, or backing boards behind the wall for added strength. Using the right repair method helps the patch last longer and prevents the damage from becoming visible again after painting.
For beginners, wall repair may seem difficult at first, but most repairs are manageable with simple tools and patience. Whether you are fixing a small dent or trying to repair a larger damaged section of drywall, the goal is always the same: create a smooth, paint-ready surface that blends naturally with the surrounding wall.
Quick Repair Guide Table
| Hole Type | Best Repair Method | Materials Needed | Difficulty |
| Small nail holes | Spackle or filler | Putty knife, spackle, sandpaper | Easy |
| Medium wall holes | Mesh patch repair | Fiberglass mesh, joint compound | Moderate |
| Large drywall holes | Drywall replacement | Drywall piece, backing strips, screws | Hard |
| Cracked drywall | Joint compound and tape | Mesh tape, sanding block | Moderate |
| Loose damaged section | Full patch support | Drywall patch kit, screws, compound | Hard |
Understanding the Type of Hole Before You Start
Before beginning any repair, it is important to understand the size and condition of the damaged area. The repair process becomes much easier when you match the method to the type of hole.
Small nail and screw holes are the easiest to repair. These shallow openings are usually left behind after removing wall hooks, picture frames, or shelves. Because the drywall structure is still intact, a small amount of spackle or wall filler is usually enough to seal the area completely.
Medium-sized holes are commonly caused by door handles, minor impacts, or accidental pressure against the wall. These holes may crack around the edges or leave weak drywall paper behind. In most cases, they need some type of reinforcement, such as fiberglass mesh, before joint compound is applied.
Large drywall holes are more serious because the wall structure is damaged. These openings often happen when furniture hits the wall, plumbing repairs are performed, or drywall breaks from heavy force. Large repairs usually involve cutting out the damaged section and attaching a new piece of drywall securely.
A simple repair kit works well for many small and medium wall problems. However, when the wall feels soft, unstable, or severely cracked, stronger support methods are needed for a long-lasting repair.
Tools and Materials Needed for a Clean Wall Repair
The quality of a wall repair depends heavily on using the right tools and materials. Even simple repairs become easier when everything is prepared beforehand.
For small wall repairs, basic tools usually include a putty knife, sanding block, fine-grit sandpaper, and wall filler or spackle. These tools help create a smooth finish without damaging the surrounding paint.
Many homeowners prefer using a drywall patch kit because it simplifies the process. Most kits include mesh patches, joint compound, sandpaper, and application tools. These kits are especially useful for people who do not regularly work with drywall.
Choosing the right filler also matters. Lightweight spackle works well for small holes because it dries quickly and sands easily. Joint compound is often better for larger repairs because it spreads smoothly across wider areas. Fiberglass mesh patches add support when repairing medium-sized openings or weak drywall sections.
Safety should also be part of the repair process. Sanding drywall creates fine dust, so wearing safety glasses and a dust mask helps protect your eyes and lungs. Keeping a drop cloth nearby also makes cleanup easier after sanding and painting.
How to Patch a Small Hole in the Wall
Small holes are usually simple to repair, but careful preparation makes a big difference in the final appearance. Rushing through the process often leaves visible spots after painting.
Start by cleaning the damaged area with a putty knife. Remove loose drywall, chipped paint, or dust from the hole so the filler can bond properly. If the edges are rough, lightly sanding the area creates a cleaner surface.
Apply spackle or wall filler using a flexible putty knife. Press the filler firmly into the hole so there are no air gaps inside. Slightly overfilling the area is helpful because the material may shrink slightly while drying.
Once the filler dries completely, sand the area gently using fine sandpaper. The goal is to make the repair blend smoothly into the surrounding wall without leaving raised edges. Running your hand across the patch helps detect uneven spots that may still need sanding.
One common mistake is applying too much filler at once. Thick layers take longer to dry and may crack later. Another mistake is skipping primer before painting, which can make the patched area absorb paint differently than the rest of the wall.
How to Patch a Hole in the Wall Without a Patch
Some wall damage is small enough that no mesh or patch support is necessary. Tiny holes and shallow dents can often be repaired using only spackle or lightweight filler.
The process starts by cleaning the damaged area and removing any loose material. Once the surface is smooth, apply a small amount of filler directly into the hole using a putty knife. Press firmly to ensure the material fills the space completely.
Using spackle alone works best for narrow holes that still have strong drywall around them. Nail holes, pin marks, and small dents are good examples of repairs that usually do not require additional support.
There are situations where a patch is unnecessary because the wall structure remains solid. Adding mesh to very small holes can actually make the repair more noticeable by creating unnecessary thickness under the paint.
To prevent future cracking, avoid applying filler over dusty or damaged surfaces. Allow enough drying time between coats and avoid sanding aggressively. Smooth, thin layers usually produce the cleanest and most invisible results.
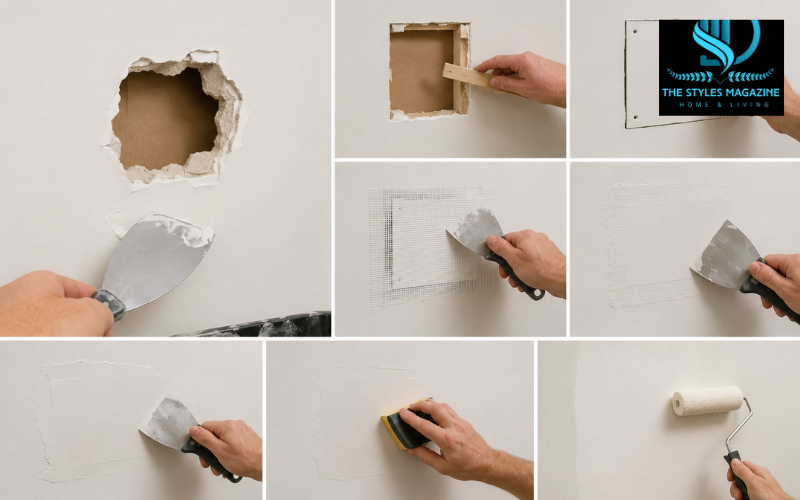
Repairing Medium-Sized Holes With Mesh Support
Medium-sized holes need reinforcement because filler alone may collapse into the wall cavity. Using fiberglass mesh creates a stronger repair and helps the compound stay in place while drying.
To patch a hole in the wall with mesh, begin by sanding rough drywall edges around the damaged area. Loose drywall paper should be removed because it can create bumps under the final finish.
Once the area is prepared, place a self-adhesive fiberglass mesh patch over the hole. Make sure the patch fully covers the damaged section while remaining flat against the wall surface.
Spread joint compound over the mesh using a putty knife. The first coat should press through the mesh openings to create a solid bond with the wall underneath. After the first layer dries, apply additional coats while feathering the edges outward. This blending process helps hide the outline of the patch once painted.
Patience is important during this stage. Thin layers dry more evenly and reduce the chance of visible repair marks. Sand lightly between coats to maintain a smooth surface.
How to Fix a Large Hole in the Wall
Large drywall damage requires a stronger repair process because the surrounding wall may no longer provide enough support. Simply covering the hole with filler usually leads to weak results.
The first step is cutting away damaged drywall until the opening has clean, straight edges. A drywall saw is commonly used to create a square or rectangular opening around the broken section.
Next, install wooden support pieces behind the drywall. These backing strips give the new drywall section something secure to attach to. Screw the backing boards firmly into place through the existing drywall edges.
Cut a replacement drywall piece that matches the size and thickness of the removed section. Attach it securely to the backing supports using drywall screws. The surface should sit level with the surrounding wall.
Many homeowners wonder how to fix a hole in the wall without a stud nearby. In these cases, wooden backing strips act as temporary support anchors inside the wall cavity. This method creates stability even when wall studs are not accessible.
After securing the drywall piece, apply mesh tape over the seams and spread joint compound across the repair. Multiple thin layers are usually needed to hide the seams completely. Sanding between coats creates a smoother and more natural finish.
How to Patch a Large Hole in Drywall With Mesh
Mesh can sometimes be used for larger drywall damage, but it works best when the hole is not excessively wide or structurally weak. Understanding the limitations of mesh repairs helps prevent future problems.
For moderately large holes, heavy-duty mesh patches provide reinforcement while supporting several layers of joint compound. The repair area should still have solid drywall around the edges so the mesh can attach securely.
One limitation of mesh-only repairs is flexibility. Without backing support, very large holes may sag or crack over time. This is especially common in areas exposed to vibration, movement, or temperature changes.
To create a more durable repair, apply multiple thin layers of compound instead of one thick coat. Each layer should dry fully before adding the next. Feathering the compound outward helps distribute stress evenly across the repair area.
Avoiding weak spots after drying also depends on proper sanding. Uneven sanding can thin the compound too much near the center of the repair, making the patch easier to damage later.
Sanding, Priming, and Painting the Repaired Area
Even a strong drywall repair can remain visible if the finishing process is rushed. Sanding, priming, and painting are what truly determine whether the repair disappears into the wall.
Drywall patches should be sanded carefully using fine-grit sandpaper. Circular motions help smooth ridges while blending the repair into the surrounding surface. Excessive sanding should be avoided because it may expose mesh or weaken the compound layers.
Primer is extremely important before painting. Fresh drywall compound absorbs paint differently than finished walls, which can leave dull or uneven spots if primer is skipped. A quality drywall primer seals the repair and creates a more even paint finish.
Matching wall texture can sometimes be more challenging than matching paint color. Smooth walls require careful sanding, while textured walls may need spray texture or sponge techniques to blend the repair naturally.
When painting, feather the paint outward beyond the repaired area. This blending method helps reduce noticeable transitions between old and new paint surfaces.
Common Wall Repair Problems and How to Avoid Them
Many wall repair problems happen because steps are skipped or materials are applied incorrectly. Understanding these issues beforehand improves the final results.
Cracking often appears when compound is applied too thickly or dries too quickly. Thin layers are stronger and less likely to shrink unevenly during drying.
Visible patch outlines usually happen when the edges are not feathered smoothly enough. Sanding carefully around the repair helps create a more natural transition between the patch and the surrounding wall.
Uneven sanding marks can become very noticeable once paint is applied. Using fine-grit sandpaper and checking the surface under bright lighting helps catch rough spots before painting begins.
Another common issue is using too much or too little compound. Excess material creates raised areas, while insufficient compound may leave shallow dents that become visible later. Building up the repair gradually creates the best finish.
Choosing the Right Hole in Wall Repair Kit
A good hole in wall repair kit can save time and make the repair process easier, especially for beginners. However, not all kits are designed for the same type of damage.
Reliable repair kits usually include mesh patches, joint compound, sanding tools, and application knives. Some advanced kits also include primer or texture repair materials for a more complete finish.
Repair kits are especially useful for homeowners who want quick solutions for everyday wall damage. They simplify material selection and reduce the chance of missing important tools during the repair.
Lightweight repair kits work best for nail holes, dents, and small wall damage. Heavy-duty kits are better suited for larger openings that need stronger mesh or more durable compounds.
Keeping a few repair tools at home is always helpful because wall damage happens unexpectedly. A basic putty knife, sanding block, and small container of spackle can handle many minor repairs without needing a full kit every time.
Conclusion
Learning how to patch a hole in the wall becomes much easier once you understand that different types of damage require different repair methods. Small nail holes may only need filler, while larger drywall openings often require mesh support, backing strips, or replacement drywall pieces for a stronger repair.
Careful preparation, proper layering, smooth sanding, and quality painting all play an important role in making the repair blend naturally into the wall. Taking time during each step usually produces better and longer-lasting results than rushing through the process.
Whether you are fixing a tiny dent or repairing a large damaged section, patience and the right materials can help create a smooth, nearly invisible finish that restores the appearance of your wall successfully.
FAQs
Can I Patch A Hole In The Wall Without A Patch Kit?
Yes, very small holes can usually be repaired with spackle or wall filler alone. Larger holes often need mesh or backing support for a stronger and longer-lasting repair.
How Long Does Wall Patch Compound Take To Dry?
Most lightweight fillers dry within 1–2 hours, but deeper repairs and joint compound may need several hours or overnight drying before sanding and painting.
What Is The Best Way To Fix A Large Hole In Drywall?
The best method is cutting out damaged drywall, installing backing support, attaching a new drywall piece, and applying joint compound in thin layers for a smooth finish.
Why Does My Wall Patch Show Through Paint?
Visible patches usually happen because the area was not sanded properly or primer was skipped before painting. Uneven texture can also make repairs noticeable.
Do I Need Primer After Patching Drywall?
Yes, primer helps seal the repaired area and prevents uneven paint absorption. It also improves paint blending and creates a smoother final appearance.
Enjoyed it? Find more exclusive content on The Styles Magazine.
Disclaimer: This article is for general informational and educational purposes only. Repair methods may vary depending on wall condition, material type, and damage severity. Always follow product instructions and use proper safety precautions during DIY repairs.