Planting white clover seeds can be a practical way to add a low-growing, useful plant to a lawn, pasture, garden edge, or ground-cover area. White clover, or Trifolium repens, is a perennial legume that grows close to the ground and spreads through creeping stems called stolons. These stems can form new roots where their nodes touch the soil.
The most important thing to understand before sowing is that white clover seed is extremely small. It does not need deep planting. In fact, burying it too deeply is one of the easiest ways to get poor establishment. Success depends much more on shallow placement, firm seed-to-soil contact, suitable moisture, and low competition from grass or weeds. USDA guidance recommends a planting depth of about 1/8 to 1/4 inch.
With good timing and preparation, white clover can be established in several different settings. The exact method changes depending on whether you are starting bare ground, overseeding an existing lawn, improving a pasture, or growing a small patch in a container.
Quick Guide Table
| Step | What to Do | Key Point |
| Choose timing | Plant when moisture and temperatures support growth | Spring is common; late-season planting needs enough time before freezing |
| Prepare soil | Remove weeds, debris, and heavy thatch | Create a firm surface with exposed soil |
| Sow seed | Broadcast or use suitable small-seed equipment | Avoid uneven, heavy patches |
| Plant shallowly | Keep seed close to the soil surface | About 1/8–1/4 inch is recommended in USDA guidance |
| Press the seed | Roll, cultipack, or gently firm the surface | Good seed-to-soil contact improves establishment |
| Water | Keep the surface adequately moist | Avoid both drying and waterlogging |
| Aftercare | Limit competition and monitor thin areas | Give seedlings time to establish before heavy use |
White clover’s small seed is particularly sensitive to excessive planting depth, so shallow sowing and firm soil contact are important.
Simple Step-by-Step Guide
- Prepare the area: Remove weeds, thick thatch, stones, and loose debris.
- Check the soil: White clover generally establishes better where soil conditions and fertility are suitable; pasture guidance commonly recommends a pH of at least about 6.0.
- Measure the seed: Follow the supplier’s rate for your cultivar and whether you are planting a lawn, pasture, mixture, or pure stand.
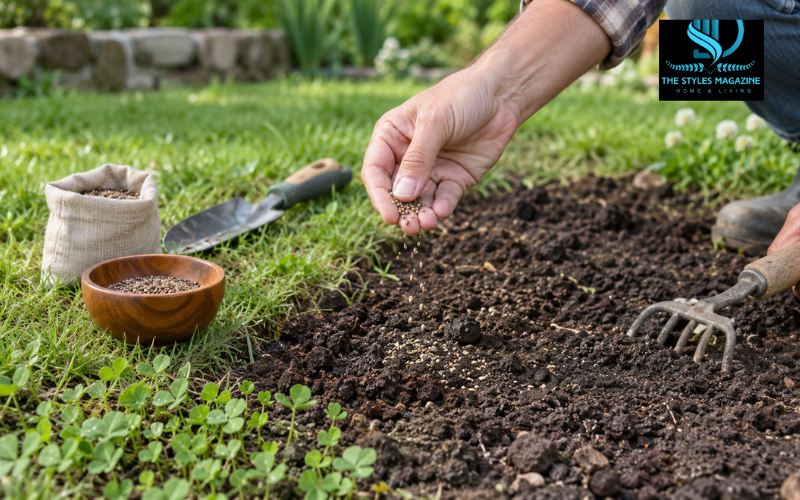
- Spread evenly: Divide the seed into two portions and broadcast in crossing directions for more uniform coverage.
- Keep it shallow: Avoid burying white clover seed deeply; USDA guidance recommends roughly 1/8–1/4 inch.
- Firm the surface: Use a roller, cultipacker, or gentle foot pressure to improve seed-to-soil contact.
- Water carefully: Keep the upper soil moist during germination and early establishment without creating waterlogged conditions.
- Protect young plants: Reduce strong competition from established grass and avoid unnecessary traffic until the clover develops.
White Clover Benefits and Where It Fits Best
White clover is a low-growing perennial member of the legume family. Its creeping stolons root at their nodes, helping the plant spread sideways and recover from mowing or grazing once established.
One of its best-known benefits is nitrogen fixation. With the help of suitable Rhizobium bacteria living in root nodules, white clover can use nitrogen from the atmosphere. This is one reason clover is commonly included with grasses in pastures and some mixed lawns. Properly established clover can reduce the need for additional nitrogen compared with a grass-only stand.
Its flowers also supply nectar and pollen to bees and other insects, while a good clover stand can provide useful soil cover. The RHS describes clover as a valuable addition to flower-rich lawns and notes that it can cope with some foot traffic.
There are limitations. White clover is relatively shallow-rooted, so prolonged dry conditions can reduce its growth and persistence. It can also spread outside the area where it was planted through both seed and stolons.
The Best Time for Planting White Clover Seeds
The best planting time depends more on temperature and moisture than on one fixed date.
Spring is often a suitable period because the soil is warming and regular rainfall can support germination. For UK lawns, the RHS specifically lists spring overseeding as an option for introducing white clover into existing grass.
Late summer or early autumn can also work, but seedlings need enough time to become established before severe cold arrives. USDA guidance advises allowing at least six weeks of growing conditions before freezing weather when late-season planting is used.
Frost seeding is another option in suitable pasture regions. Seed is broadcast over short vegetation during periods of repeated freezing and thawing. Soil movement helps bring the tiny seed into contact with the ground. University of Georgia guidance describes frost seeding as a useful method where the local winter climate provides suitable freeze-thaw cycles.
Avoid establishing clover during extremely hot, dry weather unless dependable irrigation is available. Newly germinated plants are more sensitive to moisture stress than a mature clover stand.
Choosing the Right Site and Checking the Soil
White clover generally performs best with plenty of light. Full sun is ideal, although some forms can tolerate partial shade. The RHS lists white clover for full-sun sites and notes that it grows across several soil types.
Aim for soil that holds enough moisture for growth without staying badly waterlogged. Very dry sites can make white clover difficult to establish because its root system is relatively shallow. USDA guidance notes that dry soils can limit both establishment and long-term persistence.
Soil acidity is also important. For agricultural establishment, guidance commonly recommends a soil pH of at least about 6.0. UK government guidance for establishing legumes on improved grassland gives an ideal target range of pH 6 to 7.
A soil test can also show whether phosphorus or potassium needs attention. Avoid automatically applying large amounts of nitrogen. In a grass-and-clover mixture, excess nitrogen can encourage the grass to grow more aggressively and compete with the clover.
Check the seed packet as well. Many commercial white clover seeds are already inoculated with suitable Rhizobium. If they are not, the correct inoculant can be useful, particularly where white clover has not been grown for several years.
Preparing the Ground Before Planting Clover Seed
Good soil preparation does not need to be complicated.
On bare soil, remove weeds, stones, dead vegetation, and other debris. Lightly loosen or rake the upper surface and break apart large clods. The finished seedbed should be reasonably fine, level, and firm.
Avoid leaving deeply cultivated, very loose soil immediately before planting. Small clover seeds can settle farther below the surface than intended.
If you are planting clover seed into an existing lawn, mow the grass lower than usual before sowing. Rake away heavy thatch and work over thin areas until some soil is exposed. It is important for the seed to reach the soil rather than remain caught on leaves or dead grass.
Iowa State University Extension similarly recommends removing thatch and lightly scratching the soil to improve seed-to-soil contact without burying the tiny seeds too deeply.
White Clover Seeding Rates and Seed Selection
There is no universal white clover seeding rate that suits every situation. A pure clover stand, mixed lawn, grass-and-clover pasture, overseeding project, broadcast application, and drilled planting can each require different amounts.
For example, USDA agricultural guidance lists approximately 4 pounds of Pure Live Seed, or PLS, per acre for a solid white clover stand. University of Georgia pasture guidance gives different rates for establishing clover within existing grass.
PLS means the portion of a seed lot that is both pure seed and capable of germinating. It is particularly useful when comparing agricultural seed lots.
For a home lawn, the better approach is to follow the recommended rate for the particular cultivar and product you have purchased. Check whether the seed is coated or uncoated because coating changes the weight of the product. Also check whether it has already been inoculated.
Applying more seed than recommended does not solve problems caused by unsuitable planting depth or poor soil contact.
How to Spread Clover Seed by Hand Evenly
Tiny seed can be surprisingly difficult to distribute evenly.
First measure the planting area and calculate how much seed is needed. Divide that amount into two equal portions. Spread the first half while walking in one direction across the site, then spread the second half while moving at a right angle to the first pass.
This simple cross-spreading method makes it less likely that you will leave empty strips or heavily seeded patches.
For very small quantities, clover seed can be mixed with a suitable dry, fine carrier to make hand spreading easier. Alternatively, a small handheld spreader can provide more control across a larger lawn.
Move at a steady pace and try to avoid dense piles and missed areas. Once the seed is down, concentrate on getting it into firm contact with the soil rather than covering it deeply.
Planting Depth and Seed-to-Soil Contact
Planting depth is one of the most important parts of planting white clover seeds.
USDA guidance recommends placing white clover seed approximately 1/8 to 1/4 inch deep. UK guidance for agricultural legumes similarly recommends very shallow sowing—ideally around 5 mm and no more than 10 mm.
University of Georgia pasture guidance allows a somewhat wider maximum range in certain establishment methods but still warns that planting the seed too deeply can cause poor emergence.
For a typical garden or lawn, there is little reason to deliberately bury the seed deeply. After broadcasting, rake only very lightly if necessary.
Then press the surface. A lawn roller works well for larger gardens. Agricultural sites may use a cultipacker or press wheels, while firm foot pressure can work on a small patch.
Pressing improves contact while keeping the seed shallow; burying it beneath too much soil can reduce emergence.
Watering, Germination, and How Fast Clover Grows From Seed
After sowing, water gently. A fine spray or soft sprinkler is better than a forceful stream because strong water can wash the tiny seeds into piles.
During germination and early seedling development, keep the upper soil moist without leaving it constantly saturated. Iowa State University Extension advises keeping newly germinated clover supplied with moisture during its early establishment period.
So, how fast does clover grow from seed? There is no exact timetable that applies everywhere. Soil temperature, moisture, seed quality, planting depth, and weather all affect germination.
Under favourable conditions, seedlings can begin appearing relatively quickly. The plants then develop their familiar three-leaflet leaves. As white clover matures, creeping stolons move across the soil surface and form roots at their nodes.
Seedlings may therefore become visible fairly quickly, but creating a fuller clover-covered area takes considerably longer. Do not judge the final result only by the first few days after planting.
Planting Clover Seed in an Existing Lawn or Pasture
Overseeding established grass creates an extra challenge because the young clover is competing with plants that already have developed roots and leaves.
Before planting, shorten existing vegetation and reduce excessive thatch. On a lawn, mowing and raking may be enough. In pasture, management may include close grazing before seeding so sunlight can reach the clover seedlings.
University of Georgia Extension identifies competition from established grass as one of the main causes of unsuccessful clover establishment.
Clover can be broadcast onto suitably prepared ground. In agricultural settings, a no-till drill designed to handle very small seed may also be used.
Be cautious with nitrogen fertilizer while young clover is establishing in a grass mixture. Strong grass growth can shade and outcompete small clover seedlings.
Pasture grazing also needs to be managed carefully until the young plants are established and their stolons have begun rooting.
Planting White Clover Seeds in Pots and Containers
Planting white clover seeds in pots follows the same basic rule as outdoor sowing: keep the seed shallow.
Choose a container with drainage holes and fill it with a good-quality, free-draining growing medium. Moisten the mixture before sowing so you do not need to flood it immediately afterward.
Scatter a small quantity of seed across the surface, then gently press it into the growing medium. Avoid covering it with a thick layer of compost.
Water using a spray bottle, fine rose, or similarly gentle method so the seeds remain evenly distributed. Keep the medium moist while germination is taking place and provide good light after the seedlings emerge.
If many seedlings appear in a small pot, thin or separate them where necessary to prevent severe crowding. Potted clover also needs closer moisture checks because containers can dry much more quickly than open ground.
Saving Clover Seeds and Growing Clover From Cuttings
If you want to collect your own clover seed, leave healthy flower heads on the plant after flowering. Allow them to mature until they become brown and dry. Seed-production guidance from UC Davis notes that white clover seed is harvested when most visible heads have browned and matured.
For home collection, clip mature, dry heads into a container. Let them finish drying if necessary, then gently crush or rub the heads to release the small seeds. Store cleaned, dry seed somewhere cool and dry.
Remember that seed collected from a named cultivar may not always produce plants that look or perform exactly like the original parent population.
White clover can also reproduce vegetatively. Its creeping stolons naturally form roots at their nodes. Penn State identifies both seed and stolons as methods of white clover propagation.
Rather than using a leaf or ordinary unrooted cutting, select a healthy stolon section with a rooted or root-capable node and establish that node in moist soil. For covering a large lawn or pasture, however, planting seed is much more practical.
Aftercare and Common Planting Mistakes
Keep young clover adequately moist while its root system develops and avoid unnecessary traffic over newly germinated areas.
Do not rush to mow tiny seedlings. Allow the plants to become properly rooted first so a mower does not pull them from the soil. Once established, white clover tolerates regular mowing reasonably well. If attracting pollinators is one of your goals, allow some flowers to open between mowing sessions.
Several common mistakes can prevent good establishment. Planting too deeply is one of the biggest. Others include spreading seed over thick thatch, failing to create seed-to-soil contact, allowing seedlings to dry out, planting during unsuitable weather, ignoring heavy weed or grass competition, and applying unnecessary nitrogen to a young grass-and-clover mixture.
Do not mistake mature drought tolerance for seedling drought tolerance either. New plants still need dependable moisture, and established white clover can also lose vigour during prolonged dry conditions because of its relatively shallow roots.
Conclusion
Successful planting white clover seeds is less about complicated techniques and more about getting several small details right. Choose a suitable planting period, prepare a firm seedbed, place the seed very shallowly, create strong seed-to-soil contact, and maintain reliable moisture while seedlings establish.
The best method will differ depending on whether you are creating a clover-rich lawn, improving an existing pasture, filling bare ground, or growing white clover in pots. Your local temperature, rainfall, soil conditions, and existing vegetation should guide your final approach.
White clover is adaptable, but its tiny seeds need careful handling at the beginning. Keep them close to the surface, reduce competition during early growth, and give the plants enough time to develop rooted stolons. Those simple steps provide a much better foundation for a healthy and persistent clover stand.
FAQs
How Deep Should White Clover Seeds Be Planted?
White clover seeds should be planted very shallowly. USDA guidance recommends approximately 1/8 to 1/4 inch deep because planting tiny clover seed too deeply can reduce successful emergence.
What Is The Best Time For Planting White Clover Seeds?
Spring is commonly suitable when moisture and temperatures favour germination. Late-summer or autumn planting can also work where seedlings have sufficient growing time to establish before freezing weather.
Can I Spread White Clover Seed Over An Existing Lawn?
Yes. Mow the lawn fairly short, remove excessive thatch, and expose some soil before overseeding. Seeds that remain trapped above the soil are less likely to establish evenly.
Does White Clover Need A Lot Of Fertiliser?
Established white clover can fix atmospheric nitrogen through its relationship with suitable Rhizobium bacteria. However, phosphorus, potassium, soil pH, and other fertility needs should still be guided by soil conditions or testing.
Can White Clover Tolerate Dry Conditions?
Established white clover can cope with some dry conditions, but young seedlings still need reliable moisture. Its relatively shallow root system means prolonged drought can reduce growth and persistence.
Enjoyed it? Find more exclusive content on The Styles Magazine.
Disclaimer: This article is provided for general gardening and educational purposes only. Planting results can vary depending on climate, soil type, rainfall, seed variety, site preparation, and local growing conditions. Always follow the instructions supplied with your white clover seed and consider local agricultural or horticultural guidance when managing larger lawns, pastures, or specialised planting areas.