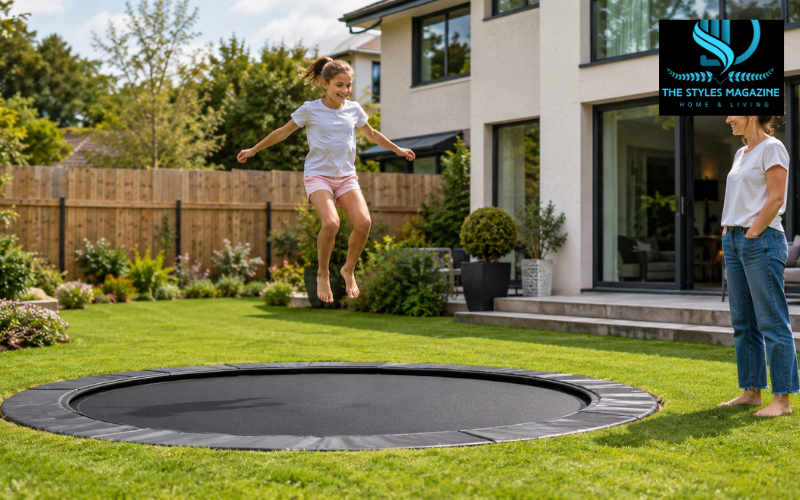
An in ground trampoline is installed inside a prepared hole so its jumping surface sits level, or almost level, with the lawn. Unlike a standard trampoline raised on legs, it has a low entry point and creates less visual clutter. A true flat-ground model finishes level with the grass, while some in-ground designs leave the padded frame slightly above it.
Homeowners often choose this design because it is easier to step onto, less noticeable from a patio, and less exposed than a tall trampoline during windy weather. The lower height can reduce the distance of a fall from the edge, but it does not remove injury risks. Safe use, suitable padding, clear space, and supervision still matter.
Buying an in-ground trampoline involves more than choosing a size. The project may require excavation, soil removal, retaining panels, drainage work, and airflow planning. Costs vary with the kit, soil, equipment access, and whether the work is DIY or professional. Current premium purpose-built kits in the United States commonly cost more than $2,000 before excavation or landscaping.
Quick Guide: In Ground Trampoline vs Above-Ground Trampoline
| Feature | In Ground Trampoline | Above-Ground Trampoline |
| Entry height | Level or close to the lawn | Usually requires a ladder |
| Appearance | Blends into the landscape | More visible in the yard |
| Installation | Requires digging and drainage planning | Faster and easier to assemble |
| Cost | Higher because of excavation and materials | Usually more affordable |
| Relocation | Difficult to move | Easier to dismantle and relocate |
| Wind exposure | Less exposed when correctly installed | More exposed and must be anchored |
| Maintenance | Requires pit and drainage checks | Mainly frame, mat, and anchor checks |
Quick Buying Checklist
- Measure the available yard space and required safety clearance.
- Choose between round, rectangular, low-ground, and fully flush designs.
- Check the frame quality, weight limit, padding, and warranty.
- Confirm whether the kit includes retaining-wall panels and vented pads.
- Plan excavation, drainage, airflow, soil removal, and landscaping costs.
- Check local utility lines, property rules, and installation requirements.
- Make sure replacement mats, springs, pads, and netting are available.
How an In-Ground Trampoline Works
The pit gives the jumping mat room to move downward. Most manufacturers call for a bowl-shaped hole: the ground near the frame remains higher for support, while the center is deeper for clearance beneath the mat. Exact dimensions must come from the manual for the selected model. BERG, for example, tells owners to mark model-specific measurements and dig to the stated depth.
The frame rests on firm ground around the edge. A retaining wall keeps surrounding soil from sliding inward and pressing against the structure. Without proper support, wet or shifting soil may reduce pit space, hold moisture against metal parts, and make maintenance difficult.
Airflow is equally important. When a jumper lands, the mat pushes air into the pit. If the air cannot escape quickly, the bounce may feel slow and the pads may lift or slap. Purpose-built systems use vented pads, gaps, or airflow features to solve this. Capital Play, for example, includes a retaining wall and vented safety pads in its kits.
A standard above-ground trampoline can sometimes be modified, but it may not be designed for soil pressure, limited airflow, or long-term use inside a pit. A purpose-built in-ground model is usually the more predictable option.
Main Benefits and Possible Drawbacks
The main benefit is easy access. Children, older users, and anyone who dislikes ladders can step onto a low or flush surface more comfortably. The lower profile also opens the view across the yard. BERG describes its InGround models as low-entry designs and its FlatGround models as fully level with the garden.
An in-ground model is less exposed to wind than a trampoline standing several feet above the lawn. However, it still needs to be installed and secured according to the manufacturer’s instructions.
The disadvantages are mostly below ground. Digging can be difficult in rocky soil or heavy clay. Water may collect, soil can collapse inward, and leaves or animals may enter the pit. The trampoline is also harder to relocate. Owners should expect regular checks of the drainage, retaining system, frame, mat, springs, and pads.
In-Ground Trampoline vs Above-Ground Trampoline
An above-ground trampoline is usually faster and cheaper to set up. It can often be assembled on a suitable level surface, anchored, and moved later. An in-ground trampoline requires more planning and permanent changes to the yard, but it offers easier access, a cleaner appearance, and a shorter fall distance at the edge.
Neither design is injury-proof. A ground-level mat can still send a jumper onto the lawn, frame, springs, or another person. An enclosure may remain useful, especially for younger users or yards near hard landscaping. Safe rules matter with both styles: follow the stated age and weight limits, avoid untrained flips, and allow only one jumper at a time.
Renters, frequent movers, and budget-conscious households may prefer an above-ground model. Homeowners creating a long-term landscape and willing to manage excavation and drainage may find an in-ground system more suitable.
Round, Rectangular, and Flat-Ground Designs
Round trampolines are popular for family recreation and tend to guide casual jumpers toward the center. Rectangular models provide a broad usable area and are often chosen for tumbling, gymnastics practice, and controlled jumping. They can also fit well along a fence line or in a narrow yard.
A partly sunken model leaves the padded edge slightly above the grass. A flat-ground trampoline places the frame at lawn level for a more seamless appearance, but it may require more exact excavation and careful ventilation. Manufacturers offer round, oval, square, and rectangular in-ground models, so the choice should reflect usable space rather than the largest size available.
Measure the full outside dimensions, not only the mat. Keep the obstacle-free clearance required by the manual around and above the trampoline.
Choosing the Best In-Ground Trampoline
The best in-ground trampoline is one that matches the users, site, and maintenance plan. Look for a strong, corrosion-resistant frame and confirm both the total and single-user weight limits. Compare warranties for the frame, mat, springs, padding, and net because coverage may differ by part.
The protective pad should fully cover the frame and springs without opening gaps during use. Check how it is attached, whether replacements are available, and how air escapes from the pit. Bounce quality depends on the mat, springs, frame, pit clearance, and airflow working together.
Clear manuals, available replacement parts, and responsive support can be more valuable than the lowest price. Confirm whether the kit includes the retaining wall and vented padding.
Reddit and owner forums can reveal real-world concerns such as muddy pits, pad noise, drainage failures, and unexpected excavation costs. Use those discussions to identify questions, not as a replacement for the manual. Recent threads, for example, discuss airflow differences between purpose-built brands and the often-overlooked cost of excavation and retaining work.
What an In-Ground Trampoline Kit Should Include
A complete kit normally includes the frame, jumping mat, springs or elastic rods, and protective pads. Better all-in-one packages may also provide retaining-wall panels, fittings, anchors, and installation instructions. Capital Play states that its kits include the frame, retaining wall, springs, mat, and vented pads, while Akrobat’s guide shows PVC retaining panels attached to the frame.
Do not assume every product includes everything needed below the lawn. Gravel, geotextile fabric, drainage pipe, excavation tools, landscaping materials, and an enclosure may be separate purchases. Compare the packing list with the manual before ordering and avoid mixing unrelated frames, walls, pads, or nets.
In-Ground Trampoline Cost and Budget Planning
In current 2026 U.S. listings, premium purpose-built round and rectangular kits often cost about $2,200 to $2,800. Smaller, simpler, or discounted products may differ, so this is a planning range rather than a fixed quote.
Installation costs depend on soil volume, access for equipment, local labor, disposal charges, drainage needs, and retaining-wall design. Professional installation can add several thousand dollars; one current cost guide notes that it may reach $3,500 or more in difficult cases.
DIY work can reduce labor costs, but equipment rental, soil removal, gravel, fabric, tools, and lawn repairs still add up. Include future replacement pads, mats, springs, and netting in the budget. A cheap kit may become costly if parts are difficult to obtain.
Planning an In-Ground Trampoline Installation
Choose a level, open part of the yard with suitable drainage and enough clearance around the frame. Avoid low areas where rain collects. Consider where the excavated soil will go and whether machinery can reach the site without damaging gates, paving, irrigation, or plants.
Before digging in the United States, contact 811 and wait for buried utilities to be marked. The national service warns that striking a buried line can cause injury, repair costs, and service disruption. Outside the United States, use the equivalent local utility-location service.
Check local permit rules, homeowners’ association requirements, property setbacks, and insurance conditions. Sandy soil may collapse easily, while clay may drain slowly. A high water table, nearby slope, or regular flooding may require advice from a drainage contractor, landscaper, or engineer.
Read the complete manual before marking the lawn. Using dimensions from another trampoline can leave too little jumping clearance or weak support around the frame.
In-Ground Trampoline DIY Installation Process
Mark the excavation area according to the manufacturer’s measurements. Remove the turf carefully if it will be reused. Dig the supporting outer shelf first, then shape the deeper center bowl. Check dimensions often because an over-dug edge may need rebuilding.
Assemble the frame on level ground and follow the recommended spring sequence so tension is spread evenly. Capital Play advises fitting springs at opposite clock positions before adding the rest. Attach the retaining panels as directed, then place the structure on firm, level support around the pit.
Add the specified drainage materials, fit the pads and vents, and install anchors or an enclosure if required. Before normal use, check that the frame does not rock, the mat cannot touch the bottom, and air escapes freely. Begin with gentle test bounces and stop if the mat bottoms out, the walls move, or the pads lift sharply.
Drainage, Retaining Walls, and Airflow
Loose soil should not fall against the springs or crowd the moving mat. Purpose-built PVC or metal panels are convenient because they match the frame. Treated timber, masonry, or custom metal may be used in professionally designed projects, but each material has different drainage and structural needs.
Geotextile fabric can separate soil from gravel and reduce weed growth. Washed gravel may improve drainage, but it will not solve every water problem. Heavy clay or a high water table may require a drain line, dry well, sump system, or another location. Water should never be redirected toward a building foundation or neighboring property.
Air must leave the pit when the mat drops. Vented pads, frame openings, or airflow mats reduce resistance. Do not seal the whole perimeter with tightly packed soil or dense edging unless the manufacturer allows it.
In-Ground Trampoline Safety and Net Options
A lower jumping surface can reduce fall height, but trampoline use still carries risk. Jumpers can collide, land badly, hit the frame, or fall beyond the edge. The U.S. Consumer Product Safety Commission has advised that children under six should not use full-size trampolines, and safety research has identified padding and enclosures as common protective measures.
An in-ground trampoline with a net may be sensible when children use it, space is limited, or hard surfaces and slopes are nearby. A net does not replace supervision or safe behavior. Follow the manufacturer’s rules, allow one jumper at a time, keep the mat dry, and stop use when parts are damaged.
Maintain the required clear zone. Soft lawn is preferable to concrete, stone, furniture, or play equipment near the edge. Regularly inspect pad coverage, springs, mat stitching, net openings, frame joints, anchors, and the gap beside the lawn.
Maintenance, Lifespan, and Common Problems
Remove leaves, toys, and rubbish before they block drainage or airflow. After heavy rain, check for standing water, muddy walls, and soil movement. Persistent water should be corrected because moisture can speed corrosion and attract insects or animals.
Inspect the frame and springs for rust, bending, or loose connections. Make sure retaining panels remain upright and firmly attached. Replace padding that is cracked, thin, or loose, and replace a mat with damaged fabric or separated stitching.
Common problems include weak bounce from trapped air, pad slap, the mat touching the pit floor, blocked drainage, sinking frame supports, and pests below the trampoline. Early repairs are usually simpler. Keep the manual, model number, purchase record, and part details for ordering correct replacements.
Conclusion: Deciding Whether an In-Ground Trampoline Is Right for Your Yard
An in-ground trampoline offers easy access, a lower visual profile, and a more integrated backyard design. Those benefits come with responsibilities: the pit must be correctly shaped, the frame needs firm support, soil must be retained, water must drain, and air must escape.
Compare the available space, soil, budget, intended users, and willingness to maintain a below-ground structure. A purpose-built in-ground trampoline kit with compatible retaining walls, vented padding, clear instructions, and available parts is usually a better long-term choice than burying an unrelated standard frame.
For a suitable yard and careful installation, an in-ground trampoline can be practical and attractive. For a wet site, short-term home, or limited budget, an above-ground model may be more sensible. The best choice is based on safety, correct installation, and realistic long-term care rather than appearance alone.
Frequently Asked Questions
Is An In Ground Trampoline Safer Than An Above-ground Trampoline?
Its lower height may reduce the distance of a fall, but it does not remove injury risks. Safe padding, clear surrounding space, supervision, and responsible jumping rules remain important.
How Much Does An In Ground Trampoline Cost?
The total cost depends on the trampoline kit, size, excavation, drainage, soil removal, retaining walls, and labor. Professional installation usually costs more than completing a suitable DIY project.
Does An In Ground Trampoline Need Drainage?
Yes. Good drainage helps prevent standing water, corrosion, muddy soil, pests, and frame damage. Some yards may need gravel, drainage pipes, a dry well, or professional water-management work.
Can A Standard Trampoline Be Installed In The Ground?
It may be possible, but standard models are not always designed for limited airflow, soil pressure, or underground moisture. A purpose-built in-ground trampoline kit is generally the more reliable choice.
Does An In Ground Trampoline Need A Safety Net?
A net is not always included, but it can provide useful protection for children or yards near hard surfaces, slopes, and obstacles. Follow the manufacturer’s safety and enclosure recommendations.
Enjoyed it? Find more exclusive content on The Styles Magazine.
Disclaimer: This article is provided for general educational and informational purposes only. Installation requirements can vary according to the trampoline model, soil conditions, drainage, local regulations, and property layout. Always follow the manufacturer’s instructions, check for underground utilities before digging, and consult a qualified installer, landscaper, drainage specialist, engineer, or local authority when necessary. The website is not responsible for injuries, property damage, installation errors, or costs resulting from the use of this information.