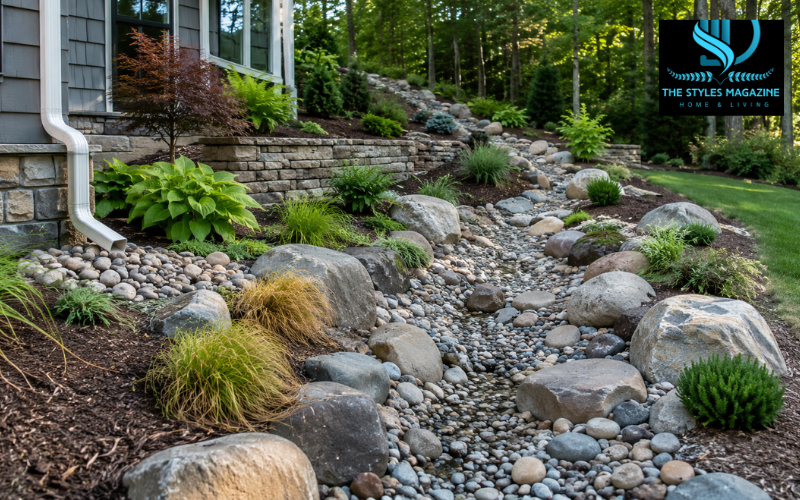
A dry creek bed is a shallow, stone-lined channel that looks like a small natural stream when it is dry. Unlike a real creek, it usually carries water only during rain or after snowmelt. The channel may collect runoff from a roof, sloped lawn, driveway edge, or low part of the yard and guide it toward a safer place.
A well-designed dry creek bed has two jobs: giving runoff a planned route and adding an attractive landscape feature. It may replace a muddy strip of grass, soften a slope, or create a natural-looking border.
This guide explains planning, materials, construction, budget ideas, walkways, fence-line designs, French drains, and common failures.
Dry Creek Bed Quick Guide
| Feature | Practical Guidance |
| Main purpose | Redirect surface runoff and improve landscaping |
| Best location | Low areas, slopes, downspout routes, and fence lines |
| Common materials | Landscape fabric, boulders, river rock, and gravel |
| Shape | Gently curved with a lower center |
| Drainage outlet | Lawn, rain garden, swale, or approved drainage point |
| Maintenance | Remove leaves, sediment, weeds, and displaced stones |
| Best for | Surface water, mud, and minor erosion problems |
| Not ideal for | Basement leaks, groundwater, or serious foundation drainage |
Basic Installation Steps
- Observe where rainwater enters and flows across the yard.
- Mark a natural, gently winding route.
- Dig a shallow channel with a lower center.
- Create a steady slope toward a safe outlet.
- Install durable landscape fabric.
- Place large boulders before adding smaller stones.
- Test the water flow and correct weak areas.
- Add suitable plants along the edges.
How a Dry Creek Bed Improves Yard Drainage
Rainwater becomes a problem when it cannot soak into the soil quickly enough. Roofs, patios, driveways, and compacted lawns increase surface runoff because water moves across them instead of entering the ground. Fast runoff can create puddles, wash away mulch, cut channels into slopes, and carry soil into streets or storm drains.
The EPA recommends slowing, spreading, or directing runoff through suitable landscape features rather than allowing it to rush across bare ground.
A dry creek bed for drainage works as an open surface channel. Water enters at an upper point, follows the lower center of the bed, and leaves through a planned outlet. It can receive water from an extended downspout, intercept runoff moving down a hill, or connect several wet areas.
This solution is most useful for visible surface water that follows a clear path. It may help where grass stays soggy or runoff removes soil. It is not a cure for basement leaks, a high water table, failed waterproofing, or deep groundwater, which may need other repairs.
Decorative and Functional Dry Creek Beds
A decorative dry creek bed is mainly created for appearance. It may sit in a dry garden, curve through planting beds, or provide texture where plants are difficult to grow. Because it is not expected to carry much water, its route and stone depth are usually chosen for visual balance.
A functional dry creek bed must be designed around water. Its starting point, channel size, slope, stone weight, and outlet all need to match the runoff reaching it. A pretty arrangement of loose pebbles may look convincing during dry weather but can fail during the first strong storm.
Some projects combine both purposes. Choose a decorative design when drainage is not the main concern. Choose a functional design when you can identify a water source, downhill route, and safe outlet. Professional sizing may be wise when runoff is heavy or difficult to judge.
Planning the Route and Safe Drainage Outlet
Begin by observing the yard during rain. Note where water enters, where it slows, and which direction the ground naturally falls. A garden hose can help mark a flowing, gently curved route. Curves should look natural, but they should not be so sharp that water crashes into the outer bank and removes soil.
The outlet matters more than the decorative details. Water should not be directed toward the house, a septic area, a well, a retaining wall, a public walkway, or a neighboring property.
Depending on local rules, the outlet may lead to a broad lawn, a planted basin, a rain garden, an approved drainage swale, or a legal stormwater connection. Local regulations can control changes to surface drainage, especially near streams, wetlands, roads, and property lines.
Before excavation, check for buried utility lines. In the United States, 811 provides the national call-before-you-dig service. Other countries and regions have their own utility-location systems.
Choosing the Right Width, Depth, and Slope
There is no single correct size for every dry creek bed. Light runoff may need only a narrow channel, while roof drainage or a large slope may require more capacity. Soil, rainfall, and the outlet also affect sizing.
Shape the bed with a lower center and gently rising sides. This keeps ordinary flow in the middle while providing extra room during heavier rain. Wide, shallow sides usually look more natural and are easier to stabilize than steep trench walls.
The channel also needs a steady downhill grade. A completely flat bed may hold stagnant water and sediment, while a very steep one can move water fast enough to shift rock.
Building-science guidance for surface swales commonly uses a moderate 2% to 4% lengthwise slope, although the correct grade depends on the site and expected flow. Steeper channels may need larger stone, check rocks, or professional design to slow the water.
Avoid treating three feet wide or one foot deep as a universal rule. Size the channel for the actual runoff, and do not make it so narrow that stormwater jumps over the banks.
Essential Materials for a Natural-Looking Creek Bed
Most dry creek beds use several stone sizes. Large boulders placed along bends and banks act as visual anchors and help protect soil from fast-moving water. Medium river rock fills the sides and higher-flow zones. Smaller rounded stones and gravel create the stream floor, but they should not be used alone where strong water could carry them away.
A durable geotextile or heavy-duty landscape fabric can separate the rock from the soil. This reduces soil mixing, sinking stones, and weed growth. The fabric should be strong enough for drainage work, overlap at the seams, and remain completely covered.
However, fabric cannot correct poor grading. Fine soil, leaves, and other debris may still collect above it over time.
Other useful materials include landscape paint, stakes, a level, a hand tamper, edging stone, crossing pipe, and outlet protection. Plants are optional and should match local sunlight, soil, climate, and moisture.
How to Build a Dry Creek Bed Step by Step
- Mark the route. Lay out the channel with garden hoses or landscape paint. Check that the route begins where runoff enters and ends at a safe outlet. Walk around it from several angles before digging.
- Remove plants and excavate. Cut away turf and dig the channel. Form a low middle and broad banks instead of creating a narrow ditch with vertical sides. Keep the removed soil for shaping nearby planting areas, provided it will not block drainage.
- Establish the grade. Use a long level, laser level, or string line to confirm a continuous fall toward the outlet. Correct low spots before adding fabric and stone.
- Prepare the entrance and outlet. The inlet may need a large splash stone under a downspout. The outlet often needs larger rock spread over a wider area so flowing water does not dig a new erosion hole.
- Install the fabric. Lay the geotextile smoothly across the floor and sides. Overlap the seams in the direction of water flow and secure the edges temporarily. Do not leave the fabric exposed to sunlight.
- Place the largest rocks first. Set boulders along curves, at grade changes, and near the outlet. Partly bury some stones so they appear natural and are less likely to move.
- Add medium and small stone. Cover the entire channel while keeping a visible low path through the center. Mix stone sizes instead of creating neat, even bands.
- Test the system. Run water through the bed with a hose where practical. Inspect it again during the next strong rain. Correct weak banks, exposed fabric, and areas where water leaves the planned route before adding delicate plants.
How to Build a Dry Creek Bed on a Budget
Stone and delivery often form the largest cost, so measure the route and estimate the required volume before ordering. Local quarry stone is often more practical than imported decorative rock.
Reserve premium river rock for the most visible sections and use suitable lower-cost stone in hidden layers. However, all stone placed in the main water path must be heavy enough to remain stable during rain.
You may also reuse clean, solid rocks already available on the property. Check local landscape suppliers for mixed-size material, delivery minimums, discounted stone, or leftover materials from larger orders.
Completing the project in sections can spread the expense, but each completed section must still drain correctly. Do not leave an unfinished channel where runoff can reach exposed soil and cause erosion.
Avoid saving money by skipping the outlet, using weak fabric, or guessing at the grade. Repairing washed-out gravel and damaged soil later may cost more than building the channel correctly. A smaller, properly planned dry creek bed is better than a large feature that cannot handle the water entering it.
Dry Creek Bed Landscaping Ideas
The most convincing dry creek bed landscaping looks irregular without appearing careless. Use gentle changes in width, a few larger bends, and groups of rocks rather than placing every stone at equal distances.
Partly bury larger boulders so they appear settled into the landscape. Turn their broad, interesting faces toward the main viewing area. Place some near bends or changes in ground level, as though moving water naturally uncovered them.
Plants can soften the edges and connect the dry creek bed to the rest of the yard. Ornamental grasses and sedges add height and movement, while ferns and hostas may suit shaded, moist locations.
In hot or dry areas, native grasses, drought-tolerant flowers, and low shrubs may be more reliable. Plant choice should reflect the site’s actual moisture pattern. The banks may remain dry most of the year even when the channel briefly carries stormwater.
Extension guidance recommends matching plants to drainage, sunlight, shade, and local growing conditions rather than choosing them only for appearance.
A small bridge, stepping stones, or one focal boulder can add interest. Use restraint so the bed still looks natural.
Designing a Dry Creek Bed Along a Fence
A dry creek bed along a fence can make good use of a narrow side yard, but the route needs careful planning. Leave enough room to inspect, clean, and repair the fence posts.
Repeated water flow should not wash soil away from post footings or keep wooden fence parts wet. Move the center of the channel far enough from the fence to protect its base.
Keep the complete drainage route inside your property. The outlet must not send water under the fence and into a neighboring yard. Redirecting runoff onto nearby land can cause damage and may break local drainage rules.
When space is limited, use a narrow channel with gentle curves and stable stones instead of trying to include large bends. Upright grasses, compact shrubs, and low-maintenance ground covers can soften the straight fence line without blocking access.
Consider what lies beyond the fence. A lower lot, retaining wall, basement, or paved area may make the route unsafe. Local advice is important near property boundaries.
Adding a Dry Creek Bed Walkway
A dry creek bed walkway may cross the channel with stepping stones or a small bridge. The crossing must remain stable when the bed is carrying water, not only when it is dry.
Use broad, flat stones with a textured, slip-resistant surface. Support them on a firm base so they do not wobble or sink. Keep the walking surface above the level of normal water flow.
Loose pea gravel is unstable in busy paths and difficult for wheels or people with limited mobility. A bridge may be better where the channel is deep, regularly carries water, or needs open maintenance access.
Do not place a crossing where it sharply narrows the channel. A narrow point can trap leaves, branches, and other debris, causing water to spill over the banks.
Bridge supports and spaces between stepping stones should remain easy to inspect and clean. The finished crossing should fit the natural appearance of the dry creek bed while providing a safe and clear path through the yard.
Dry Creek Bed vs. French Drain
A dry creek bed mainly handles visible surface runoff. It remains open, is easy to inspect, and can become a noticeable landscaping feature.
A French drain is a gravel-filled underground trench that usually contains a perforated drainage pipe. It collects water from the surrounding soil and directs it toward an outlet. Colorado State University guidance notes that a French drain requires a sloped trench and a working outlet.
Choose a dry creek bed when water flows across the ground from a downspout, hill, driveway, or paved area and you want an attractive open channel.
A French drain may be more suitable when water spreads through the soil, collects beside a structure, or must pass underground because an open drainage channel would block a lawn, path, or usable space.
A dry creek bed is usually easier to inspect because blockages and damaged areas remain visible. A French drain is hidden but may be more difficult to clean or repair if soil enters the pipe or the outlet becomes blocked.
The two systems can work together. The open bed may carry surface water while a pipe handles underground seepage or passes under a walkway. Neither system should empty beside the foundation or into an area that cannot accept the added water.
Common Dry Creek Bed Failures and How to Prevent Them
Dry creek bed failure usually begins with poor planning rather than poor stone choice. A channel without a continuous downward grade develops puddles that collect mud, leaves, and other debris. A bed without a safe outlet simply moves the water problem somewhere else.
Small gravel is another common weakness. Strong runoff can push light stones into the lawn or pile them at bends. Larger stones should be used at the inlet, outer curves, steeper sections, and outlet.
If water can move large rocks, the channel may be too narrow, too shallow, or too steep for the amount of runoff entering it.
Exposed landscape fabric makes the bed look unfinished and may tear under sunlight or foot traffic. Cover it completely and repair exposed sections before soil begins working underneath.
Leaves, sediment, and mulch should be removed before they block the low center. Nearby bare soil may also need plants, mulch, or erosion protection to stop sediment from repeatedly washing into the channel.
Poor placement is more serious than poor appearance. Never direct water toward a house, neighboring property, public walkway, or unstable slope.
After major storms, check for moved stones, blocked crossings, standing water, damaged banks, and erosion at the outlet. Correcting a small problem early can prevent the need for a complete rebuild.
Conclusion: Creating a Dry Creek Bed That Lasts
A successful dry creek bed begins with understanding where water comes from and where it can drain safely. Good grading, enough channel capacity, stable stone, protected banks, and a dependable outlet matter more than decorative details.
Once those parts are correct, curves, boulders, plants, and walkways can turn the drainage route into a natural-looking landscape feature.
The best design balances practical water control with the character of the yard. It should look attractive when dry, carry runoff without spilling over, and remain easy to inspect. Regular checks after heavy rain will reveal whether stones are shifting, sediment is collecting, or the outlet needs attention.
Built with careful planning rather than guesswork, a dry creek bed can reduce mud and erosion while adding lasting structure and natural beauty to the landscape.
Frequently Asked Questions
Does A Dry Creek Bed Really Help With Drainage?
Yes. A properly graded dry creek bed collects surface runoff and guides it toward a safe outlet. It can reduce standing water, muddy grass, washed-out mulch, and minor soil erosion.
How Deep Should A Dry Creek Bed Be?
Depth depends on the amount of water and the size of the yard. Many residential beds are shallow, but heavy runoff may require a wider, deeper channel designed by a drainage professional.
Does A Dry Creek Bed Need Landscape Fabric?
Landscape fabric is not always required, but durable geotextile can prevent stones from sinking into soil and reduce soil mixing. It must be fully covered and cannot replace correct grading.
Can A Dry Creek Bed End Anywhere In The Yard?
No. The outlet must release water safely without damaging foundations, paths, slopes, or neighboring properties. Suitable options may include a broad lawn, rain garden, swale, or approved drainage system.
Is A Dry Creek Bed Better Than A French Drain?
A dry creek bed is usually better for visible surface runoff, while a French drain handles water moving through soil. Some yards benefit from using both systems together.
Enjoyed it? Find more exclusive content on The Styles Magazine.
Disclaimer: This article provides general landscaping information. Drainage needs, soil conditions, and local rules vary, so consult a qualified professional before managing heavy runoff or drainage near buildings and property boundaries.