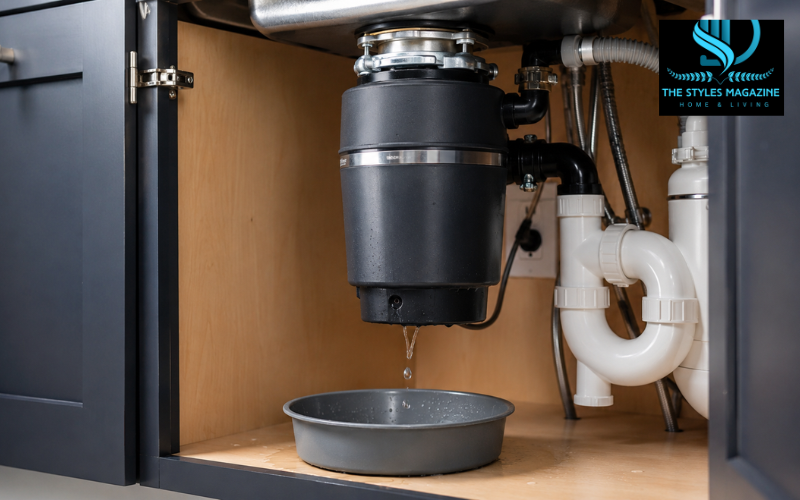
A garbage disposal leaking from bottom areas can look like a simple plumbing problem, but the real cause is not always obvious. Water may truly be escaping through the lower housing, reset-button opening, casing seam, or power-cord area. In that situation, the disposal may have internal corrosion, a damaged seal, or a cracked body, and replacement is usually the safest solution.
However, water follows gravity. A leak that starts at the sink flange, dishwasher hose, or drain pipe can travel down the outside of the unit and drip from the bottom. Moen’s current troubleshooting guidance notes that a damaged discharge gasket can allow water to move between the shell and the disposal before appearing at the bottom cover plate.
The key is to disconnect the power, dry the unit, and inspect each connection from top to bottom. Some leaks only need a new gasket, tighter screws, or fresh sealant. A genuine internal leak normally calls for garbage disposal replacement.
Quick Guide Table
| Leak Location | Likely Cause | Recommended Action |
| Sink flange | Loose mounting or failed sealant | Reseal or tighten mounting parts |
| Dishwasher hose | Loose clamp or damaged hose | Tighten or replace the hose |
| Discharge pipe | Worn gasket or loose screws | Replace gasket or tighten screws |
| Reset button | Internal seal or housing failure | Replace the disposal |
| Electrical cord area | Internal leak or corrosion | Disconnect power and replace unit |
Quick Leak-Checking Steps
- Disconnect the disposal from power.
- Stop using the sink and dishwasher.
- Dry the disposal and all connections.
- Run a small amount of water into the sink.
- Inspect the flange, hoses, and pipes from top to bottom.
- Replace the unit if water comes directly through the lower housing.
Why a Bottom Leak Requires Immediate Attention
A disposal combines running water, a motor, wiring, and a power connection in a small space beneath the sink. When water reaches the lower part of the unit, it may come close to the reset button, cord connection, outlet, or hardwired electrical parts. That creates a possible shock, short-circuit, overheating, or fire risk.
This concern is not theoretical. The U.S. Consumer Product Safety Commission previously recalled certain disposal switch accessories after water entered their power modules and caused overheating damage. The recall involved the switch accessory rather than the disposal itself, but it shows why water around under-sink electrical equipment should never be ignored.
A slow leak can also swell the cabinet floor, stain wood, encourage mold growth, and damage stored items. If the dishwasher drains through the disposal, running the dishwasher may send more water through the leaking connection. Stop using both appliances until you know where the water begins.
Essential Safety Steps Before Checking the Disposal
Start by switching the disposal off. Unplug it from the outlet under the sink. If the unit is hardwired or the plug is difficult to reach safely, turn off the correct circuit breaker at the main electrical panel. Manufacturer troubleshooting instructions also tell users to disconnect the power supply before working around a disposal.
Do not run the sink or dishwasher while preparing the area. Remove cleaners, paper products, and other items from the cabinet. Place a bucket or shallow tray beneath the disposal, then wipe up standing water with towels.
Never touch wet wiring, a wet plug, or a damp outlet. Do not press the reset button while water is present, and do not restore power simply to see whether the disposal still works. If the outlet, wiring, cord, or electrical cover appears wet, damaged, scorched, or loose, leave the circuit off and contact a qualified electrician.
Confirm Whether the Leak Is Truly Coming From the Bottom
After the power is off, dry the disposal, sink flange, dishwasher hose, drain elbow, and nearby pipes completely. Paper towels are especially useful because even a small amount of water will leave a clear mark.
Wrap or hold dry paper towels around three common leak points: the sink flange at the top, the drain discharge connection, and the dishwasher inlet. Current manufacturer guidance uses this same basic method to separate top, side, and lower leaks.
With the disposal still unpowered, place a stopper in the sink and add a modest amount of water. Check the top flange first. Then release the stopper and watch the side connections as the water drains. Use a flashlight and inspect from the highest point downward.
If every upper connection stays dry but water forms directly at a casing seam, reset-button opening, cord entry, or another part of the lower housing, the problem is likely inside the disposal. If an upper paper towel becomes wet first, the apparent bottom leak is probably water running down from that connection.
Common Leak Locations and What Each One Means
The sink flange is the metal ring around the drain opening. A leak here often points to worn sealant, loose mounting hardware, or a damaged gasket. Moen advises checking the mounting parts and replacing worn sealant when the top connection no longer seals properly.
The dishwasher inlet is the smaller side connection where the dishwasher drain hose attaches. A loose clamp, aging hose, or damaged connector can release water, especially during a dishwasher drain cycle.
The larger side pipe is the disposal’s discharge connection. Loose screws, a poorly seated elbow, or a worn rubber gasket can cause water to escape. On some designs, that water can travel inside the outer shell and emerge near the bottom plate, which can easily be mistaken for internal failure.
Water that starts directly at the reset button, casing seam, electrical opening, or solid lower housing is more serious. Once other connections have been ruled out, this pattern usually means the sealed body of the appliance has failed.
Garbage Disposal Leaking From the Bottom Reset Button
The reset button protects the motor by resetting an internal breaker after an overload or jam. It is not a drain opening and is not meant to carry water. If water is coming directly through the reset-button area, it usually suggests that moisture has entered or travelled through the disposal’s lower housing.
Before deciding that the unit has failed internally, dry everything and repeat the leak test. Water from a discharge gasket or side connection may run behind the outer shell and appear close to the reset button. A wet reset-button area alone does not prove where the leak began.
Once you confirm that the water originates inside the lower casing, do not press the button or reconnect the power. The button itself is rarely the repairable part in this situation. The safer response is to check the warranty, contact the manufacturer if coverage may apply, and prepare to replace the disposal.
Garbage Disposal Leaking From the Bottom Near the Electrical Cord
A garbage disposal leaking from bottom near electrical cord areas should be treated as an immediate electrical hazard. The source may be internal corrosion, a crack in the housing, a failed internal seal, or water travelling from a higher connection.
Keep the disposal unplugged or leave its breaker off. Do not handle the plug or cord with wet hands, and do not use an extension cord or another outlet to test the appliance. If water has reached the receptacle, air-switch module, junction box, or exposed wiring, an electrician should inspect the electrical parts before power is restored.
After the area is safe, check the flange, dishwasher hose, and discharge pipe. If those areas remain dry while water appears at the cord entry or surrounding casing, replacement is usually more sensible than attempting to open and reseal the motor housing.
Garbage Disposal Leaking From the Bottom When the Dishwasher Runs
When the leak appears only as the dishwasher drains, begin with the dishwasher hose. Follow it from the dishwasher to the disposal inlet. Look for a loose clamp, a split near the hose end, a hardened connection, or water tracks running down the side of the disposal.
Inspect the disposal’s dishwasher connector as well. Manufacturer troubleshooting guidance recommends checking the connector and clamp for damage, deterioration, and tightness.
A blockage or poor drain arrangement can also place extra pressure on a weak connection. Do not assume the disposal itself is broken until the hose and inlet have been checked.
A controlled dishwasher drain test should only be performed after the disposal’s electrical power has been disconnected and the outlet and wiring are completely dry. Watch the connection from a safe distance and stop the test as soon as water appears. When the electrical area is wet or difficult to inspect safely, leave the dishwasher off and call a plumber.
If the inlet and hose remain dry but water emerges through the lower housing during the drain cycle, the unit may be leaking internally and should remain out of service.
Garbage Disposal Leaking From the Bottom and Not Working
A disposal that leaks and does not work may have two separate problems, such as a loose drain gasket and a jammed motor. It may also have moisture damage affecting the motor, reset system, cord, switch, or outlet.
A normal overload can trip the disposal’s internal breaker. Under dry conditions, manufacturer instructions may recommend clearing a jam, confirming that the internal plate moves, and then pressing the reset button. That advice does not apply when water is present around the lower housing or electrical parts.
Do not press the reset button, restore the breaker, or repeatedly flip the wall switch while the disposal is wet. Doing so will not fix a leaking seal or cracked casing and may increase the electrical risk.
Replacement is the safer choice when there is a confirmed internal leak together with corrosion, burning smells, visible electrical damage, repeated breaker trips, or a motor that no longer operates after the external leak source has been addressed.
Can You Fix a Garbage Disposal Leaking From the Bottom?
The answer depends on where the leak starts. External leaks are often repairable. A loose dishwasher clamp can be tightened. A damaged hose can be replaced. A worn discharge gasket can be changed, and loose discharge screws may be tightened carefully. A top-flange leak may require new sealant, a gasket, or attention to the mounting assembly.
A true internal leak is different. Household disposals are generally sold as sealed appliances rather than motor housings that homeowners rebuild. Opening the lower body can expose electrical components and may affect the warranty. Patching a casing crack does not correct corrosion or seal damage inside the unit.
Tightening bolts will only help if the bolts belong to the connection that is leaking. Overtightening screws can damage plastic parts, crush a gasket, strip a thread, or distort a flange. Follow the instructions for your exact disposal model rather than applying extra force.
Call a plumber when the plumbing connections are difficult to reach, badly corroded, incorrectly aligned, or still leaking after a gasket repair. Contact an electrician when the outlet, hardwiring, switch, breaker, cord, or junction box has become wet or damaged. A plumber can often replace a corded disposal, but hardwired work may require an electrician depending on local requirements and the installer’s qualifications.
Repairable Leaks That Can Look Like Bottom Leaks
A garbage disposal leaking from top may send a thin stream down the side of the housing. The usual causes include worn sealant, loose mounting screws, or damaged mounting gaskets. These problems can often be corrected without replacing the motor unit.
The dishwasher hose can create the same illusion. Water may run along the hose, cross the outer casing, and drip from the lowest point. A worn drain-elbow gasket is another common source. Moen specifically warns that water from this gasket can travel between the shell and the disposal and exit at the bottom cover.
Condensation, a leaking faucet base, or water splashed around the sink can also reach the disposal. That is why visual inspection alone is not enough. Drying each surface and testing one water source at a time gives a more reliable answer than replacing the unit based only on where the final drip falls.
Garbage Disposal Replacement: When a New Unit Is Necessary
Plan for garbage disposal replacement when water is confirmed to be coming through the casing, reset-button opening, cord entry, or a permanent seam in the body. Replacement is also reasonable when the unit is badly corroded, cracked, unusually noisy, repeatedly trips its breaker, smells burned, or has a failed motor.
Check the product label for the model and serial number before removing anything. Review the warranty because some manufacturers may repair or replace a defective unit during the covered period. Moen, for example, states that qualifying manufacturing defects may receive in-home repair or replacement under the applicable warranty.
When selecting a new unit, compare the mounting system, available cabinet height, discharge-pipe position, dishwasher connection, horsepower, feed type, and power setup. Current manufacturer guidance highlights cabinet dimensions, plumbing alignment, mounting style, and power source as important compatibility points.
Do not assume every new disposal will connect to the old pipes without adjustment. A taller or wider model may require the discharge pipe to be repositioned. The existing mounting ring may also be incompatible or too worn to reuse. Proper alignment and fresh gaskets reduce stress on the new unit and help prevent another leak.
Common Mistakes and Misleading Online Advice to Avoid
Do not cover an internally leaking casing with epoxy, tape, silicone, or another surface patch. Even if the drip slows, the repair does not address hidden corrosion, failed seals, or water near the electrical system. It can also hide the leak until cabinet damage becomes worse.
Do not continue using the sink because the leak is small. Each use can send more water into the cabinet or electrical area. Avoid running the dishwasher as well when it drains through the disposal.
Another dangerous mistake is pressing the reset button or powering a wet disposal. Reset instructions are intended for dry units that have tripped because of an overload or jam, not appliances with active water leaks.
Searches such as “garbage disposal leaking from bottom Reddit” may provide useful personal experiences, but advice from an anonymous post cannot confirm the design, wiring, warranty, or exact leak path of your unit. Use the model’s official instructions and contact a qualified professional when electrical safety or internal damage is uncertain.
Conclusion: The Safest Response to a Bottom-Leaking Disposal
When a garbage disposal is leaking from the bottom, first assume that water may be travelling from somewhere higher. Disconnect the power, stop using the sink and dishwasher, dry the entire assembly, and inspect the sink flange, dishwasher connection, and discharge pipe from top to bottom.
A loose clamp, damaged hose, worn gasket, or failed flange seal can often be repaired. Water that truly begins at the reset button, power-cord opening, casing seam, or lower housing usually points to a failure inside the appliance. In that case, continued use and temporary patches create unnecessary risk.
The safest final decision is simple: repair the external connection when testing clearly identifies it, but replace a disposal with a confirmed internal bottom leak. That protects the electrical system, the sink cabinet, and the rest of the kitchen from avoidable damage.
Frequently Asked Questions
Can A Garbage Disposal Leaking From The Bottom Be Repaired?
External leaks from hoses, gaskets, or mounting connections can often be repaired. A confirmed leak through the bottom casing, reset button, or cord opening normally requires disposal replacement.
Why Is My Garbage Disposal Leaking Near The Reset Button?
Water near the reset button may indicate a failed internal seal or corroded housing. First check whether water is running down from a higher connection before replacing the unit.
Can I Use My Sink While The Garbage Disposal Is Leaking?
It is safer to stop using the sink and dishwasher until the leak is identified. Continued use may cause cabinet damage or allow water to reach electrical parts.
Why Does The Disposal Leak Only When The Dishwasher Runs?
The dishwasher hose, clamp, or disposal inlet may be loose, cracked, or blocked. Inspect these connections carefully before assuming that the disposal has developed an internal leak.
Should I Seal A Bottom Leak With Epoxy?
Epoxy, tape, or silicone should not be used to patch an internally leaking disposal. These temporary fixes may hide corrosion and allow water to reach the motor or wiring.
Enjoyed it? Find more exclusive content on The Styles Magazine.
Disclaimer: This information is for general guidance only. Disconnect electrical power before inspecting a disposal. Contact a qualified plumber or electrician if the leak involves wiring, a wet outlet, or internal damage.