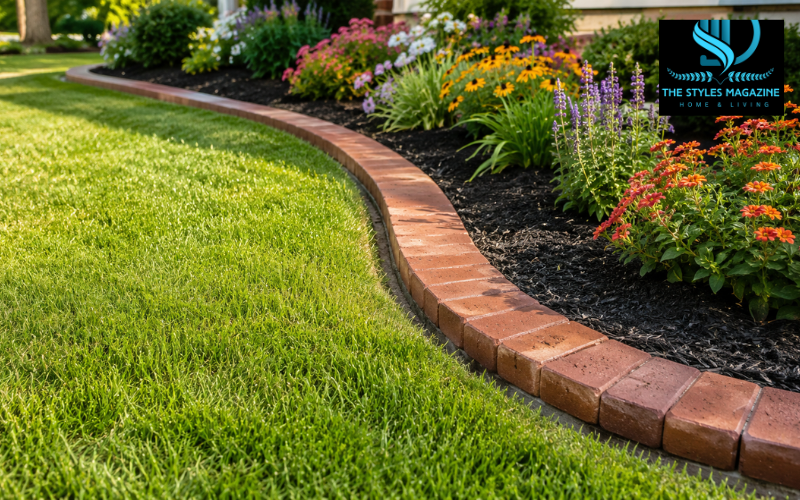
Brick garden edging is a row of bricks or brick-shaped pavers placed along a lawn, flower bed, path, tree ring, or mulched area. It creates a clear line between two parts of the landscape, helping the garden look organized rather than unfinished. Depending on the layout, the bricks can sit level with the grass, stand upright, form a decorative angle, or rise high enough to hold back a shallow layer of soil or mulch.
A well-planned border can slow lawn grass from spreading into planting beds, keep mulch and gravel away from nearby surfaces, and give mower wheels a firm edge to follow. Brick also works with straight lines, broad curves, traditional homes, cottage gardens, and modern landscapes. Home improvement guidance continues to recommend flat or upright brick arrangements for separating lawns and beds.
This guide covers brick garden edging ideas, suitable materials, popular layouts, planning, DIY installation, costs, and maintenance. The goal is to help you build a border that fits the garden and stays stable through rain, mowing, and seasonal ground movement.
Brick Garden Edging Quick Guide
| Feature | Best Choice |
| Easy mowing | Flat mowing-strip layout |
| Holding mulch or soil | Soldier-style or raised edging |
| Decorative appearance | Sawtooth or curved pattern |
| Simple DIY installation | Dry-laid bricks without mortar |
| Traditional garden style | Red clay or reclaimed bricks |
| Modern landscape | Smooth concrete pavers |
| Long-term stability | Compacted gravel base and bedding sand |
| Sloped or high border | Mortar or professional installation |
Simple Installation Steps
- Mark the border with string, rope, or a garden hose.
- Remove grass, roots, and loose soil.
- Dig a trench suitable for the chosen brick layout.
- Add and compact a crushed-stone or paver base.
- Spread a thin, level layer of bedding sand.
- Place and level each brick with a rubber mallet.
- Fill the joints and firmly backfill both sides.
Why Brick Edging Works Well in a Garden
Brick edging gives grass, plants, paths, and mulched areas a clear visual boundary. This makes even a simple planting bed look intentional. A flat border can also act as a mowing strip, allowing one mower wheel to travel over the bricks and reducing hand trimming.
The border can slow grass runners and make weeds easier to notice, although it will not block every root or seed. Bricks also help contain bark mulch, small gravel, and loose soil. A taller soldier-style or raised border holds material better than a flush strip, while a level border is usually easier to mow across.
Brick may not be ideal where the ground moves heavily, drainage is poor, tree roots are close to the surface, or a steep slope needs structural support. In those settings, bricks can tilt unless the base is improved. A high border that retains substantial soil should be treated as a small retaining wall rather than simple edging.
Choosing the Right Bricks for Garden Edging
Clay paving bricks offer a traditional appearance and usually keep their color because it runs through the fired material. Concrete pavers come in regular shapes, textures, and blended colors. Purpose-made edging blocks may include curved faces or interlocking shapes, while reclaimed bricks add age and character when they remain sound.
Not every old building brick is suitable for ground contact. Edging stays damp and may experience repeated freezing and thawing. The Brick Industry Association notes that exterior paving units are selected for resistance to moisture, wear, and environmental exposure. In cold climates, choose paving brick or concrete pavers rated for outdoor freeze-thaw conditions rather than assuming any leftover wall brick will last.
Reject bricks with deep cracks, soft faces, heavy flaking, or crumbling edges. Mixed reclaimed bricks can look attractive, but different heights make leveling harder. Choose a color and texture that connect with the house, walkway, patio, or other hard surfaces.
Brick Garden Edging Ideas for Different Landscapes
Straight borders suit formal gardens, narrow side yards, and modern homes. They work well beside rectangular lawns, foundation beds, or straight walkways. Stakes and a tight string help keep the line true.
Curved borders feel softer and suit cottage gardens, mixed flower beds, and natural planting areas. Broad curves are easier to build with standard bricks than tight circles. A flush single row creates a quiet mowing edge, while a double row adds more visual weight.
Around trees or small garden islands, bricks can form a simple ring, but avoid piling deep soil or mulch against the trunk. Contrasting colors can also create a subtle pattern. Red bricks beside pale gravel form a strong outline, while similar shades create a calmer look.
Popular Brick Layout Styles
A flat mowing-strip layout places bricks close to lawn level. It is practical for mowing but does not hold back much soil, so it works best where lawn and bed heights are similar.
In sailor style, bricks lie flat with their long sides running across the border, creating a wider strip for mower wheels. Soldier style turns the bricks upright, producing a taller edge that retains mulch more effectively but requires a deeper trench and stronger side support.
Sawtooth edging sets bricks at an angle so the exposed corners form a zigzag. It has a classic decorative look, especially with red or weathered brick, but can be harder to mow beside. Flat layouts favor easy care, upright layouts add height, and angled layouts place appearance first.
Raised Brick Garden Edging
Raised brick garden edging sits above the lawn instead of finishing level with it. A single raised course can define a bed and reduce mulch spill. Two or more courses create a stronger architectural line but need more careful preparation.
The base should be level, firm, and able to drain. Water trapped beneath a raised border can weaken the soil and increase movement. When several courses are used, joints should be staggered, and the bricks should not simply be stacked loose. Mortar, approved landscape adhesive, or professional masonry may be appropriate depending on the height and purpose.
Raised edging can help on a gentle slope or where the bed is slightly higher than the lawn. It is not a substitute for an engineered retaining wall on a steep grade. Seek professional advice when the border holds back substantial soil, sits beside a driveway, or could affect drainage near a building.
Planning the Border Before Installation
Decide whether the finished bricks will be flush, slightly raised, upright, or angled. This choice controls trench depth and brick quantity. Also consider mower access and whether the border could become a trip point beside a path.
Use stakes and string for straight runs. For curves, place a rope or garden hose on the ground and adjust it until the shape looks balanced. The Home Depot recommends laying bricks along the planned line before digging so spacing can be checked and unnecessary cuts reduced.
Measure the full length, divide it by the exposed dimension of one brick, and add extra units for cuts, breakage, and future repairs. Check for irrigation lines, lighting wires, and buried utilities before digging. Plan the finished level so water continues moving away from foundations.
Tools and Materials for DIY Brick Garden Edging
A basic project usually needs bricks or pavers, a shovel, hand trowel, rake, wheelbarrow, stakes, string, and a flexible hose for curves. A hand tamper compacts the base, while a spirit level and rubber mallet help keep the bricks even.
Use compactable crushed stone or paver base for the foundation, followed by a thin, even bedding-sand layer. Belgard’s installation guidance explains that bedding sand over a prepared base helps create a smooth, supported surface.
You may also need jointing sand, polymeric sand, edge restraint, or mortar. Polymeric sand contains binders activated by water, but it must be installed exactly as directed; incorrect watering can leave residue or weak joints. Wear gloves and eye protection, plus suitable dust and hearing protection when cutting masonry.
DIY Brick Garden Edging: Step-by-Step Installation
Start by marking the border and placing a sample row along it. This confirms the width, pattern, and curve before soil is removed. Cut the grass cleanly along both sides, then remove sod, roots, and soft organic material that could settle later.
Dig the trench slightly wider than the bricks. Its depth must allow room for the compacted base, bedding layer, and buried part of the brick. The exact depth depends on soil, climate, and layout; a soldier border needs a deeper trench than a flat mowing strip.
Add crushed base in thin layers and tamp each layer firmly. Extend support beyond the brick line rather than balancing bricks on a narrow ridge. Unilock advises extending base preparation beyond the finished edge so outside units remain supported.
Spread and level the bedding sand, set the bricks one at a time, and tap them gently with a rubber mallet. Check line and height every few bricks. Finish by compacting soil or installing restraint along the sides, filling the joints, and following the manufacturer’s watering directions when polymeric sand is used.
How to Lay Brick Edging Without Mortar
A dry-laid border suits low edging, mowing strips, and decorative beds on fairly level ground. Its strength comes from the compacted base, close-fitting bricks, firm side support, and jointing sand—not from placing bricks directly on soil.
To lay brick edging without mortar, keep the bedding layer even, place bricks with consistent joints, and check the level often. Support the outside with compacted soil or proper paver restraint. Edge restraints are normally fixed into the compacted base rather than loose bedding sand.
Fill joints with clean jointing sand or a compatible polymeric product. Dry-laid bricks are easy to lift and reset if the ground moves. However, this method is less suitable for tall raised borders, steep slopes, or places exposed to vehicle tires and strong side pressure.
Installing Curved Brick Garden Edging
Begin with the smoothest curve possible. Wide bends accept standard rectangular bricks with small, even joints. Tight curves create large gaps on the outside and force inside corners together.
For a cleaner result, use smaller units, tapered pavers, or carefully cut bricks. Avoid forcing full bricks into a tight radius and filling wide gaps with loose sand, because the pattern may look uneven and move more easily.
Set several bricks without final backfilling, then step away and inspect the line. Spread small adjustments over a longer section instead of making one sudden turn. When cutting is necessary, use masonry equipment and follow its safety instructions. Secure the sides only after the curve looks smooth.
Red Brick Edging Ideas for Front Yards
Red brick edging works well when a home already has warm brick, clay roof tones, dark shutters, or traditional details. Against a green lawn, it creates a clear frame around flowers and shrubs. It can also connect a planting bed visually with a brick walkway or porch.
Useful brick edging ideas for a front yard include a flat red-brick mowing strip around foundation beds, an upright soldier course beside a walkway, or a weathered double row around cottage-style flowers. Red brick also pairs naturally with tan gravel, gray stone, dark mulch, and evergreen planting.
Avoid using too many patterns in one small front yard. When the house already has strong brickwork, a simple border often looks more built-in than an elaborate design. Matching the general color family is usually more important than finding an exact brick match.
Cost and Where to Buy Brick Garden Edging
Cost depends on border length, brick type, layout, base materials, cuts, delivery, and labor. A single flat row uses fewer units than a double row or raised wall. Reclaimed bricks may lower the purchase price, but cleaning, sorting, and replacing damaged pieces adds time.
As a broad 2026 planning figure, one current guide places brick edging materials around $1.50 to $5.50 per linear foot. Premium pavers, wide patterns, and delivery can raise the total. Professional work costs more because it includes excavation, base preparation, leveling, cutting, and cleanup. Use online averages only as a starting point and compare local written quotes for the same design and base specification.
Home Depot and similar stores carry pavers, edging units, sand, base materials, and tools, though stock and prices vary by ZIP code. Landscape suppliers and masonry yards may offer more choice or pallet quantities. When searching “brick garden edging near me,” compare dimensions, outdoor rating, delivery fees, minimum orders, return rules, and the likely availability of matching replacements.
Maintenance, Repairs, and Common Installation Mistakes
Inspect the border after heavy rain and after the first winter or wet season. Reset bricks that sink, tilt, or spread by lifting them, correcting the base, and replacing the bedding sand. Adding soil around a moving brick may hide the problem without fixing it.
Sweep fresh jointing sand into open gaps when old material washes out. Pull young weeds before their roots become established. For cleaning, begin with water, a stiff nonmetal brush, and a mild brick-safe cleaner. Test stronger products in a hidden area, especially on reclaimed brick or colored concrete.
Common mistakes include shallow trenches, roots or soft topsoil beneath the border, poor compaction, uneven bedding sand, and missing side support. Poor drainage can also cause settlement or frost movement. Mortared and raised borders should be checked for cracked joints or loose units. Brick paving guidance notes that freeze-thaw conditions can require stronger base preparation and more maintenance around mortar joints.
Conclusion: Creating a Brick Border That Lasts
Brick garden edging can make a lawn, flower bed, path, or front garden feel complete without changing the whole landscape. The best results come from choosing outdoor-suitable bricks, matching the layout to the job, and preparing a firm base. A flat mowing strip favors easy maintenance, an upright or sawtooth border creates a stronger decorative line, and raised brick garden edging adds height when properly supported.
For most DIY projects, a dry-laid border is practical because individual bricks can be adjusted or replaced. Steep slopes, multi-course borders, and areas holding significant soil may need mortar, stronger construction, or professional help. Whatever the design, careful planning, good drainage, firm side support, and occasional repairs will matter more than decoration alone.
Frequently Asked Questions
Can Brick Garden Edging Be Installed Without Mortar?
Yes. Dry-laid brick edging works well for low borders and mowing strips when the bricks sit on a compacted gravel base with bedding sand and firm support along both sides.
How Deep Should A Trench Be For Brick Edging?
The trench should fit the compacted base, bedding sand, and buried part of the brick. Flat bricks need a shallower trench, while upright soldier-style bricks require greater depth.
What Type Of Brick Is Best For Garden Edging?
Outdoor-rated clay paving bricks and concrete pavers are usually the best choices. They should resist moisture, weather, and freezing conditions without cracking, flaking, or crumbling over time.
Does Brick Edging Stop Grass From Entering Flower Beds?
Brick edging can reduce grass spread and make unwanted growth easier to control, but it may not block deep roots or seeds completely. Regular trimming and weeding are still necessary.
Is Raised Brick Garden Edging Safe For Sloped Ground?
A low raised border may work on a gentle slope with a stable base and good drainage. Taller borders holding significant soil may require mortar, stronger foundations, or professional construction.
Enjoyed it? Find more exclusive content on The Styles Magazine.
Disclaimer: This article provides general landscaping guidance. Soil conditions, drainage, climate, local rules, and project requirements vary. Consult a qualified landscaper or mason for tall, structural, or complex brick borders