Silicone caulk is one of the most common materials used in homes, especially in kitchens, bathrooms, and around windows. It creates a waterproof seal that helps prevent leaks, mold, and damage. While this makes it extremely useful, it also makes it difficult to remove when the time comes for repairs or replacement.
If you’ve ever tried to remove silicone caulk, you probably noticed how stubborn and flexible it is. Unlike other sealants, it doesn’t break easily and often leaves behind sticky residue. That’s why learning how to remove silicone caulk properly is important. Doing it the wrong way can scratch surfaces like tiles, glass, or wood, and may even make it harder to apply new caulk later.
The good news is that with the right approach, the process becomes much easier. Most successful methods involve a combination of softening the caulk and carefully scraping it away. This guide will walk you through everything you need to know in simple, easy steps so you can get clean results without damaging your surfaces.
Quick Step-by-Step Guide
| Step | What to Do | Why It Matters |
| 1 | Clean the area | Helps you see edges clearly |
| 2 | Soften the caulk (heat or remover) | Makes removal easier |
| 3 | Cut along edges | Breaks the strong bond |
| 4 | Peel and scrape | Removes main silicone layer |
| 5 | Clean residue (alcohol/vinegar) | Ensures smooth surface |
| 6 | Let it dry fully | Prepares for new caulk |
Understanding Silicone Caulk and Why It’s Hard to Remove
Silicone caulk is a flexible sealant made from silicone polymers. It is designed to stay elastic even after it dries, which allows it to expand and contract with temperature changes. This flexibility is one of its biggest advantages, but it also makes removal more challenging.
Another reason silicone caulk is hard to remove is its strong adhesive bond. It sticks tightly to surfaces like tile, glass, metal, and plastic. Once it cures, it becomes waterproof and resistant to most chemicals. This means that simple cleaning products are often not enough to break it down.
People usually need to remove silicone caulk when it becomes old, cracked, or moldy. It may also need to be replaced during renovations or when installing new fixtures. In some cases, improper application can lead to uneven sealing, making removal necessary for a better finish.
Understanding these characteristics helps explain why a careful and patient approach is required. You are not just pulling something off a surface—you are breaking a strong, flexible bond.
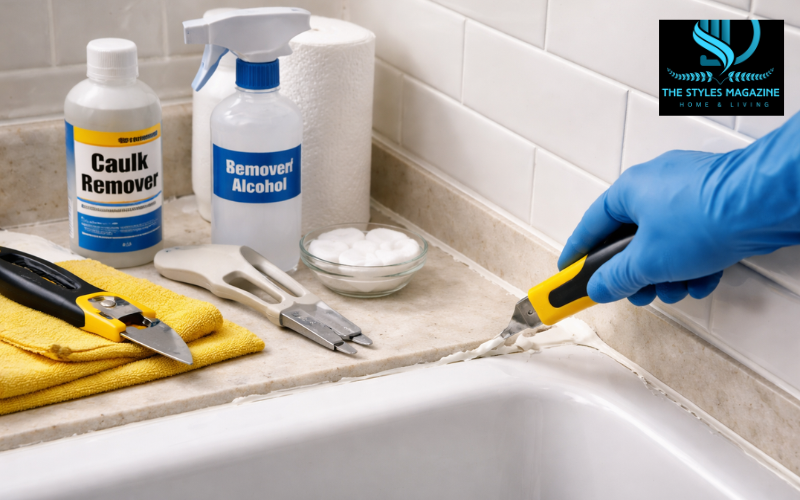
Essential Tools and Materials for Removing Silicone Caulk
Before starting the removal process, it’s important to gather the right tools. Using proper equipment not only makes the job easier but also helps protect your surfaces from damage.
Cutting tools like a utility knife or razor blade are used to score the edges of the caulk. These tools help separate the sealant from the surface. Scraping tools, such as a plastic putty knife or a specialized caulk removal tool, are useful for lifting and peeling the material without scratching.
Softening agents can make a big difference in how easily the caulk comes off. A heat gun or even a hairdryer can help soften the silicone, making it more flexible and easier to remove. There are also commercial caulk removers available that are designed to break down silicone over time.
Cleaning solutions are equally important for removing leftover residue. Isopropyl alcohol, denatured alcohol, and white vinegar are commonly used to clean surfaces after scraping. These help remove any remaining oils or particles so the area is ready for new caulk.
Step-by-Step Process to Remove Silicone Caulk Properly
The process of how to remove silicone caulk starts with proper preparation. Begin by cleaning the area to remove dust and dirt. This helps you see the edges clearly and ensures a smoother removal process.
If possible, soften the caulk first. You can use a hairdryer on a low setting to gently warm the silicone. This makes it more pliable and easier to work with. Alternatively, apply a commercial remover and let it sit for the recommended time.
Next, use a utility knife or razor blade to carefully score along the edges of the caulk. Hold the blade at a shallow angle and move slowly to avoid scratching the surface. This step is important because it breaks the bond between the caulk and the surface.
Once the edges are cut, use a plastic putty knife or caulk removal tool to lift the silicone. Try to peel it away in long strips. If the caulk is stubborn, you may need to repeat the softening process or gently scrape again.
After removing the main portion, there will likely be some residue left behind. Use a cloth or non-scratch pad with isopropyl alcohol or mineral spirits to clean the area. This helps remove any sticky remnants and prepares the surface for the final step.
Finish by wiping the area clean and allowing it to dry completely. If there was mold present, it’s a good idea to clean with a mild bleach solution to prevent future growth. A clean, dry surface is essential before applying new caulk.
How to Remove Silicone Caulk Without Damaging Surfaces
One of the biggest concerns when removing silicone caulk is avoiding damage to the surface underneath. Different materials require different approaches, and using the wrong method can lead to scratches or discoloration.
For delicate surfaces, it’s best to use plastic tools instead of metal ones. Plastic putty knives are less likely to leave marks and are safer for materials like glass, painted surfaces, or soft wood. Applying gentle pressure and working slowly is key.
Choosing the right softening method also helps prevent damage. Heat is generally safe for most surfaces, but it should always be used carefully to avoid overheating. Chemical removers can be effective, but it’s important to test them on a small area first.
Common mistakes include using too much force, holding the blade at the wrong angle, or skipping the softening step. These can all increase the risk of surface damage. Taking your time and following the proper steps will give you better results.
Surface-Specific Methods for Better Results
Different surfaces respond differently when removing silicone caulk, so it’s helpful to adjust your method based on the material.
When working with tile, a combination of scoring and gentle scraping usually works well. Tiles are durable, but grout lines can be sensitive, so care is needed. For glass surfaces, a razor blade can be used carefully at a low angle to avoid scratches.
Metal surfaces require a gentle approach to prevent marks or corrosion. Using a plastic scraper and a mild cleaning solution is often the safest method. For wood, extra caution is needed because it can scratch easily. A soft tool and minimal force are recommended.
Removing silicone caulk from windows often involves working with both glass and frames, so a balanced approach is necessary. In shower areas, mold and moisture are common issues, so cleaning thoroughly after removal is especially important.
Removing Silicone Caulk from Skin, Clothes, and Unusual Surfaces
Accidents can happen, and silicone caulk may end up on your hands or clothing during the process. Fortunately, there are simple ways to deal with these situations.
To remove silicone caulk from hands, start by rubbing it gently to loosen it. Washing with warm water and soap can help, and using a small amount of oil or alcohol may make it easier to remove.
For clothing, it’s best to act quickly before the caulk fully cures. Gently scrape off as much as possible, then use a cleaning solution suitable for the fabric. In some cases, complete removal may be difficult, especially if the silicone has already hardened.
Quick action is the key to handling these situations effectively. The sooner you address the issue, the better the results will be.
Best Cleaning Solutions to Remove Silicone Residue
Even after the main caulk is removed, residue can remain on the surface. This is where cleaning solutions play an important role.
Isopropyl alcohol is one of the most commonly used options. It helps break down oils and removes sticky residue without leaving marks. Denatured alcohol is another effective choice, especially for tougher remnants.
Other cleaners like white vinegar can be useful for light cleaning and removing minor residue. In some cases, specialized products designed for silicone removal may provide the best results.
Preparing the surface properly is essential before applying new caulk. Any leftover residue can prevent proper adhesion, so taking the time to clean thoroughly will improve the final outcome.
Common Mistakes to Avoid When Removing Silicone Caulk
Many people make simple mistakes that can make the process harder or damage the surface. One common issue is using sharp tools incorrectly, which can lead to scratches or cuts.
Skipping the residue cleaning step is another mistake. Even if the surface looks clean, leftover oils can affect new caulk. Applying new caulk too soon, before the area is fully dry, can also lead to poor results.
Using the wrong chemicals may damage certain materials or leave unwanted stains. It’s always best to choose products carefully and test them before full use.
Avoiding these mistakes can save time and effort while ensuring a cleaner, more professional finish.
Pro Tips to Make Silicone Caulk Removal Easier
There are a few simple tips that can make the process of how to remove silicone caulk much easier. Working in small sections allows better control and reduces the risk of mistakes.
Knowing when to use heat versus chemical removers can also improve efficiency. Heat works well for softening, while removers are better for breaking down stubborn areas. Combining both methods often gives the best results.
Patience is one of the most important factors. Rushing the process can lead to damage or incomplete removal. Taking your time and using the right technique will make the job smoother and more effective.
Conclusion: Clean Removal Leads to Better Results
Removing silicone caulk may seem difficult at first, but with the right approach, it becomes a manageable task. By understanding how silicone works and using the proper tools and methods, you can remove it safely without damaging your surfaces.
The key is to combine softening and careful scraping, followed by thorough cleaning. This ensures that the surface is ready for new caulk and helps achieve long-lasting results.
With a bit of patience and attention to detail, anyone can successfully learn how to remove silicone caulk and complete the job with confidence.
FAQs
What Is The Easiest Way To Remove Silicone Caulk?
The easiest way is to soften it using heat or a remover, then cut and peel it off gently. Finish by cleaning the residue with alcohol.
Can I Remove Silicone Caulk Without Damaging Surfaces?
Yes, by using plastic tools, gentle pressure, and proper softening methods, you can safely remove caulk without scratching or damaging the surface.
Does Vinegar Remove Silicone Caulk?
Vinegar helps clean residue but does not fully remove silicone. It works best as a final cleaning step after scraping the caulk.
How Do I Remove Silicone Caulk From Hands?
Rub it off gently, then wash with warm soapy water. You can also use a little oil or alcohol to loosen stubborn silicone.
Do I Need To Remove All Old Silicone Before Reapplying?
Yes, removing all old silicone is important to ensure proper adhesion and a clean, long-lasting seal when applying new caulk.
Enjoyed it? Find more exclusive content on The Styles Magazine.
Disclaimer: This content is for general informational purposes only. Always test tools and cleaning solutions on a small area first. Follow safety guidelines and manufacturer instructions when using tools or chemicals.